Everything You Need To Know About Logic’s Sampler
by Maya Wagner
It was something Logic was missing. The reason many users turned to third-party plugins and even other DAWS…
Well… have no fear… The Logic Sampler is here!!
Yes, Apple finally did it. Logic users now have access to a full-blown stock sampling instrument in Logic Pro! This post will go over the basics of the sampler and even include a few tips to help you make the most out of this new resource.
It's An Instrument!
To access the Sampler, you literally just add it like a normal instrument. Keep in mind that some sounds from the Library will be Sampler presets because EXS24 sounds have been translated to Sampler presets (goodbye EXS24…) and these sounds can be manipulated in the Sampler window. So, yeah, if you want to open the Sampler with a fresh face, simply select it from your instrument track’s instrument slot and you are good to go!
Drag and Drop
Apple has been advertising Logic 10.5’s new “drag and drop” workflow like crazy. In some cases, the function isn’t too impressive. However, when it comes to the Sampler, it is definitely a plus. You can literally drag anything (provided it is an audio file) into the Sampler. Whether it be a stack of audio files from Finder, an Apple Loop, or a clip from your arrangement, this function is pretty helpful.
The Two Modes
The Sampler has two unique modes which give some behind-the-scenes analysis of samples without the hassle of MIDI mapping (of course, you still have the option to go full-manual-mode).
Optimized Mode automatically takes your sample, analyzes it, and places the notes on the right keys of the keyboard. It’s crazy to think this is possible, but if you think about it, a little frequency analysis and Logic can tell what note is happening at a given time during the duration of a sample. Logic slices the sample up, but if there are missing notes or something like that, it is smart enough to transpose and manipulate sections of the sample to make every key on the keyboard a playable note.
*When you add a sample in Optimized Mode choose “Optimized Zone Per Note” which takes a single audio sample and slices it up. If you add a collection of samples, like a bunch of notes from a horn, for example, select “Optimize Zone Per File” which basically looks at all of the different files and collectively maps them.
Chromatic Mode
The chromatic mode doesn’t analyze notes, it simply takes the sample’s slices and lays them out on the keyboard in order, starting from your chosen note (default C2). This is great if you are working with a more percussive sample of want a bit of creative inspiration.
Again, there are two options when adding samples in Chromatic Mode. “Chromatic Zone Per File” puts each sample in its own zone across the keyboard, and “Chromatic Split at Silence” just chops detected silence out of your samples and then maps them in order.
Manipulating Samples
Ok, now that you have your sample all chopped up and mapped to your MIDI keyboard, its time to check out the parameters we can control within the Sampler. The strip across the top of the sampler’s control area allows users to quickly access different aspects of the controls.
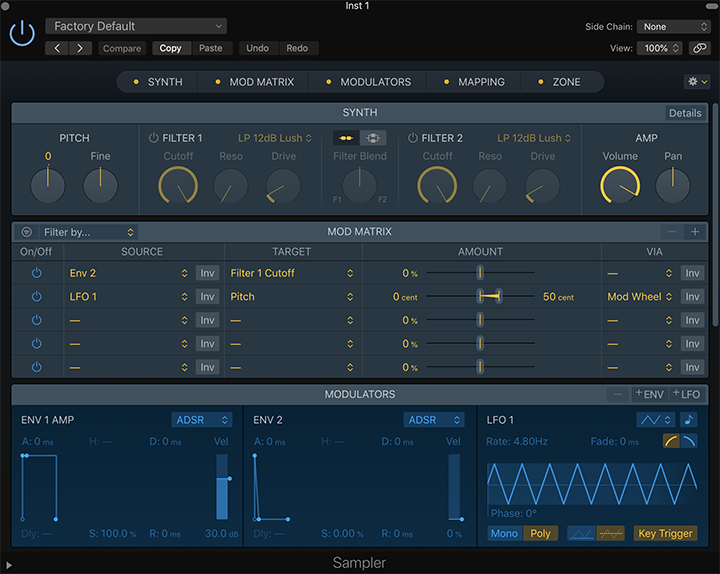
Synth
The synth view provides Alchemy-like parameters to shape the sample as a whole. One of my favorite aspects of this view is the glide control, which allows us to literally add glide to each triggered sample and control the length and timing of the glide.
Mod Matrix
The modulation view allows us to route modulation sources and targets such as LFOs and velocity, as well as set the intensity of these factors. The intensity of the modulation can even be modulated. It gets pretty deep.
Modulation
Te modulation tab allows us to add envelopes and LFOs (up to 5) which is pretty convenient
Zone
The zone module is where we find the actual sample and the visuals and controls for how it has been chopped up and analyzed. In this window we can easily go in and manually make changes to the analysis and control just how we want the sample to be chopped.
Mapping
The mapping parameter simply allows us to manually edit the MIDI mapping of individual sample sections.
So, yeah! Those are the basics of the Sampler! Now, let’s go over some little life hacks for the thing.
Tips and Tricks
Implementation with Live Loops and Step Sequencer
Logic 10.5 also comes with the beloved Step Sequencer and Live Looping area, where the Sampler can be used just like any other software instrument. This implementation allows for some really cool ways to explore a sample patch you have created!
I have found myself chopping up some samples and just throwing random patterns into the sequencer and getting some super cool combos (as well as some not-so-cool ones). Its definitely a cool way to get inspiration.
Velocity is KEY (lol get it because they are mapped to keys?)
Ok, so this is less of a tip or trick and more of a “thing to remember.” The Sampler is so cool that it incorporates velocity into the sample mappings. This means that if you hit a key on your keyboard with different pressure, you will get a different sound out of your sample. This is super cool, especially when using the MOD Matrix to control the parameters that keyboard velocity controls. This means you could make the velocity at which you strike a key control envelope or modulation strength of a key. You have so much control.
Quick Sampler
I haven’t mentioned it yet, but the Quick Sampler exists, too. If you just want to take a tiny sample and lay it out over the keyboard, the Quick Sampler is the tool for that! It also uses drag and drop cues and makes sampling mini-samples super easy.