Stock Logic Plugins You Probably Don’t Know About
by Maya Wagner
Logic is one of the most stock-plugin-rich DAWs on the market. It has a ton of native plugins and the software can be used to create extremely professional sounding productions with virtually no external processing.
The thing is, so many people get stuck using the same old plugins, most notably…
The Logic Compressor
ChromaVerb
Channel EQ
Delay Designer
However, there are so many plugins in Logic that provide amazing effects which you should definitely check out before dropping 500 on the latest Waves bundle. This post will go over a few of my personal favorites!
Clip Distortion
The Clip Distortion plug-in is super unique in that it creates a really cool inconsistent distortion. The signal is first put through a high pass filter and non-linear distortion is added. The plugin then boosts the drive of the signal and then passes it through a low pass filter. The sound is then combined with the original sound and then put through another low pass filter. It’s super good for creating thick bass sounds that are a bit more alive.
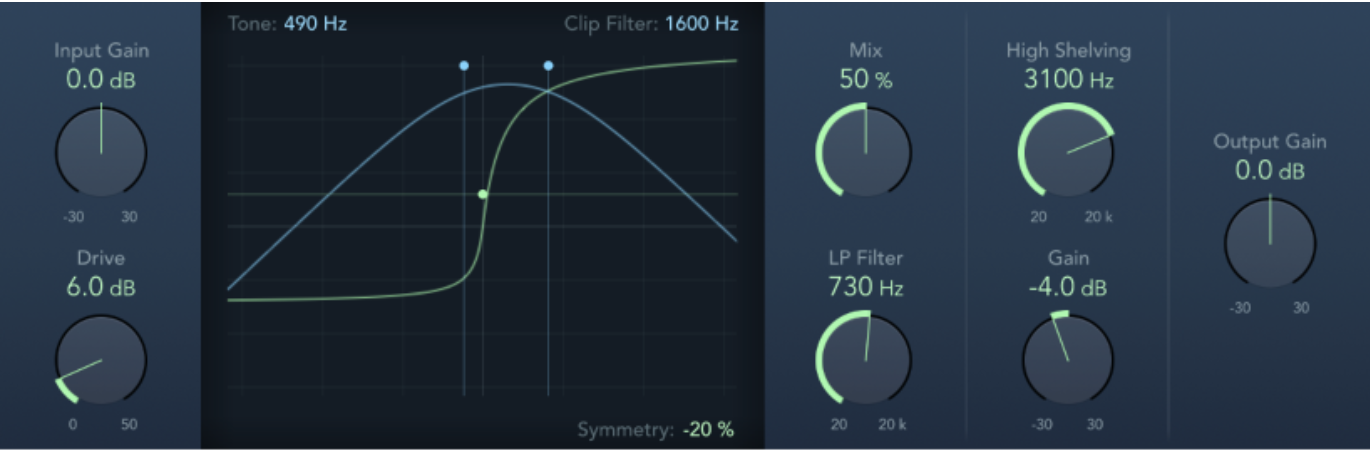
Parameters:
Drive knob: Sets the amount of drive applied to the input signal. After being amplified by the Drive value, the signal passes through a high pass filter.
Tone slider: Sets the cutoff frequency (in hertz) of the high pass filter.
Filter Display: Shows the impact of all parameters, except for the High Shelving
filter parameters, visually.
Mix Knob: Sets the ratio between the effect (wet) signal and original (dry)
signals, following the clip distortion effect’s application.
LP Filter Knob: Sets the cutoff frequency (in hertz) of the low pass filter. This processes the mixed signal.
Gain knob: Controls the amount of gain applied to the output of signals above the high shelving filter frequency.
Clip Filter Value: Set the cutoff frequency of the first low pass filter.
Symmetry Value: Shows the amount of non-linear distortion effect.
SubBass
The SubBass plugin is another awesome way to boost your bass sounds. It simply generates frequencies below the base frequency of the sound.
The SubBass should definitely be used in moderation because it is a seriously powerful frequency generator which can totally enhance sound, but also destroy your ears. Don’t try to boost the sub-frequencies with another EQ too much or it could totally mess with your mix.
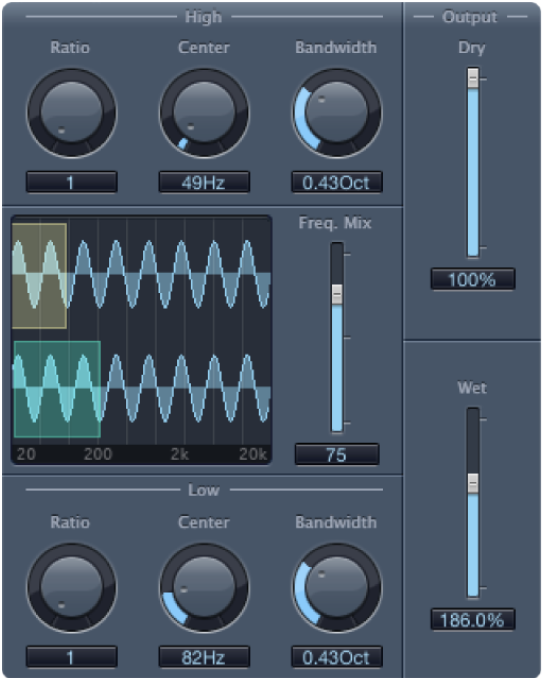
Parameters:
High Ratio knob: Adjust the ratio between the generated signal and the upper-frequency band of the original signal.
High Center knob: Set the center frequency of the upper-frequency band.
High Bandwidth knob: Set the width of the upper-frequency band.
Graphic display: Shows the selected upper and lower frequency bands.
Freq. Mix slider: Adjust the mix ratio between the upper and lower frequency bands.
Low Ratio knob: Adjust the ratio between the generated signal and the lower frequency band of the original signal.
Low Center knob: Set the center frequency of the lower frequency band.
Low Bandwidth knob: Set the width of the lower frequency band.
Dry slider: Set the amount of non-effect/original signal in the final output
Wet slider: Set the amount of effect signal in the final output
Ensemble
The Ensemble plugin allows users to create doubles (up to 8) of a given sound. It can literally be used in so many ways, but it is similar to a vocal doubling plugin in that it gives that “multi-voice” effect to a monophonic sound.
As shown below, it looks super sleek and modern and is just a cool resource that I feel like no one uses.
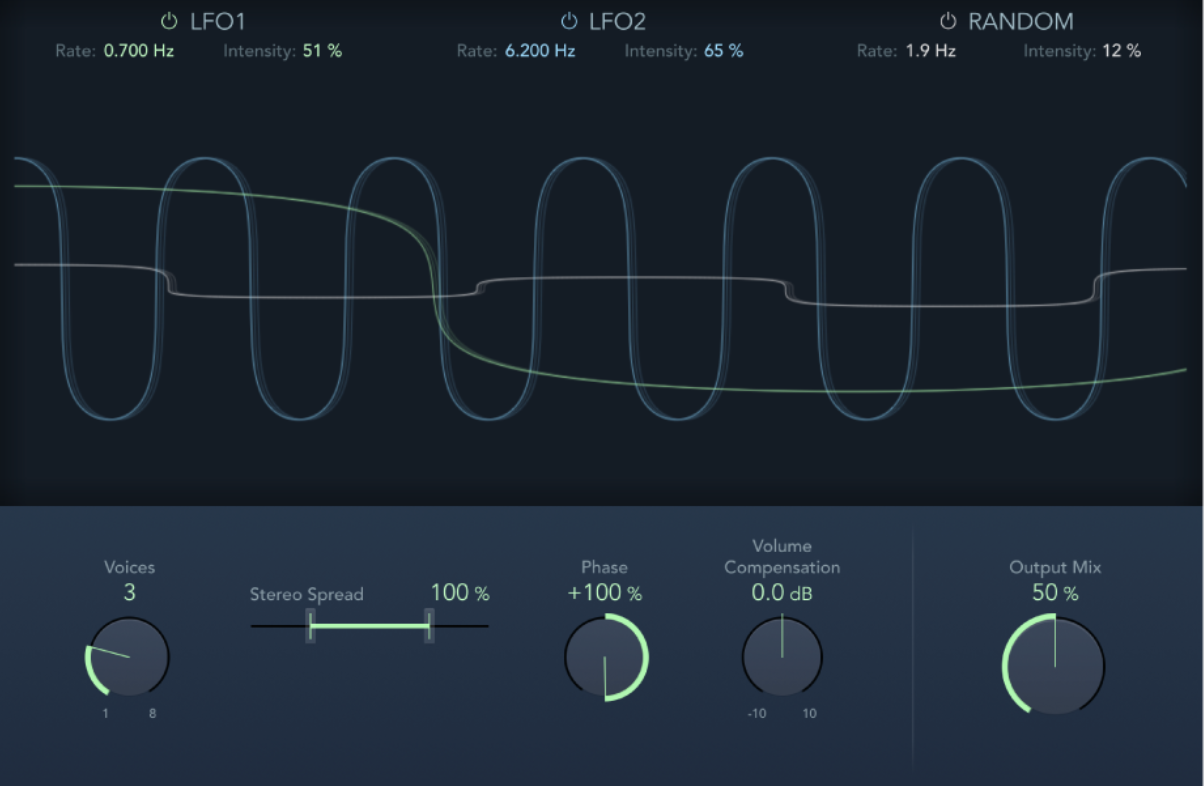
Parameters:
LFO1/LFO2/Random on/off buttons: Enable or disable LFO 1, LFO 2, or the random LFO independently.
Rate: Set the frequency of LFO 1, LFO 2, and random modulation.
Intensity: Set the amount of LFO 1, LFO 2, and random modulation.
Graphic display: Shows and lets you edit the shape and intensity of LFO 1, LFO 2, and random modulations. Modulation is represented by the waveform. The line represents the LFO intensity. The waveform represents the LFO rate. LFO1 parameters: Drag the green handle to set the modulation rate and intensity.
LFO2 parameters: Set modulation rate and intensity.
Random LFO parameters: Set modulation rate and intensity.
Voices knob: Set the number of chorus instances (voices) generated in addition to the original signal.
Stereo Spread slider: Distribute voices across the stereo or surround field. You can set a value of 200% to artificially expand the stereo or surround. This is a multi-mono effect.
Phase knob: Control the phase relationship between the individual voice modulations. The value you choose here is dependent on the number of voices, which is why it is shown as a percentage value rather than in degrees. The value 100 (or −100) indicates the greatest possible distance between the modulation phases of all voices.
Volume Compensation knob: Compensate for effects signal volume changes caused by adjusting the Voices value.
Step FX
Step FX is a powerful multi-effect that I personally don’t see too many people using. The plugin uses three separate modulators to create rhythmic enhancements of instrumental parts within an arrangement, whether subtly or intensely. Each modulator has its own envelope and provides up to 128 “steps” which can be used to control effect parameters or panning and gate. It’s got distortion, reverb, and delay also and it is a SUPER cool tool. Also, it has some wicked presets.
After playing around with this one I realized that I have spent hundreds of dollars on plugins that do the same thing as this one! Check it out it will help your creativity SO much.
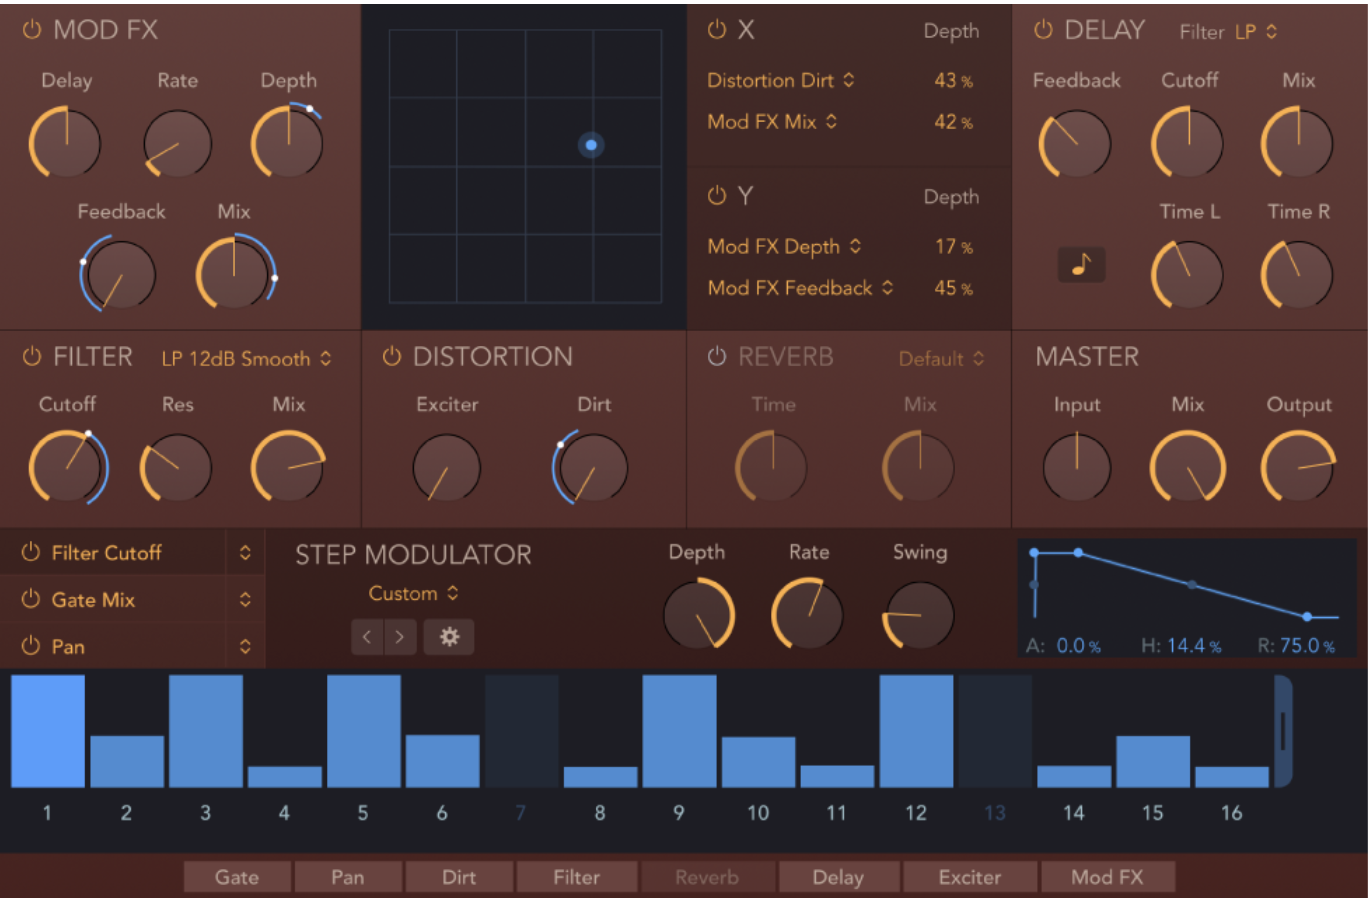
Parameters:
There is a lot to unpack with this one, so I have linked Apple’s official Logic Pro user manual for your reading pleasure!
Step Modulator Global Controls Parameter
Step Modulator Playback Controls Parameter
Step Modulator Display Controls Parameter