CTC Beat Making Station Manual
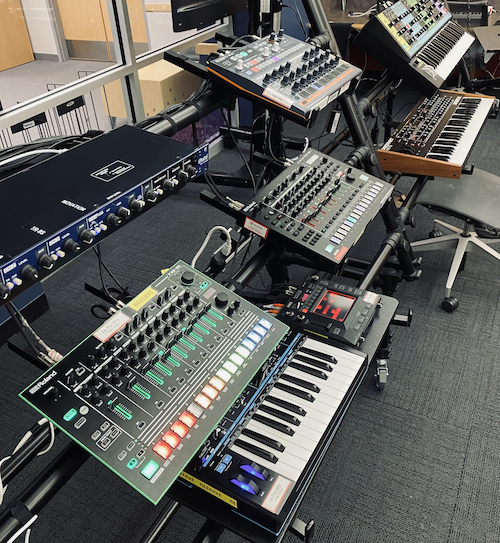
The Beat-Making Station is an interactive system of three drum machines, one monophonic synthesizer with sequencer, and one touch interface effects processing unit. All devices in the system are tempo-synced through the implementation of MIDI clock and have MIDI and audio running into an interface, making the system easily integrate with any DAW.
CLICK HERE TO BOOK THE STATION
CONTENTS:
ROLAND TR-8 IRA RHYTHM PERFORMER
ROLAND TR-8S IRA RHYTHM PERFORMER
In this system, the Arturia MiniBrute2S is the master clock. This means that this is the device that controls the transport and tempo of the system. If you make a change to the tempo on this device and press play, all the other devices will change to that tempo and begin playing. If you stop the MiniBrute2S, the rest of the devices will follow and stop along with it.
Each device in the system is sending MIDI data to a different MIDI channel. This makes sure that the devices aren't triggered by the note data of those that come before them.
All three drum machines, along with the bass station, have audio output running in parallel to one another into the interface. Depending on the capabilities of the device, this output signal may be mono or stereo. The station's audio interface is also capable of sending and returning audio to external effects processing units. This functionality is implemented with the use of the Korg Kaoss Pad; whose processed signal can then be mixed into the dry signal of the master mix.
Because there are three drum machines, each with its own individual MIDI channel, sequencing with the Beat Making Station can get pretty intense. Just pressing play on the MiniBrute will most likely lead to chaos, so let's talk about how to conquer each of the drum machines and build a beat up from the ground!
TIP: To start out, try spreading your core drum hits over the three drum machines. For example, dedicate one for the kicks, one for the snares, and one for the hi-hats. This will help you get a feel for each device and give you a starting point that you can add on to!
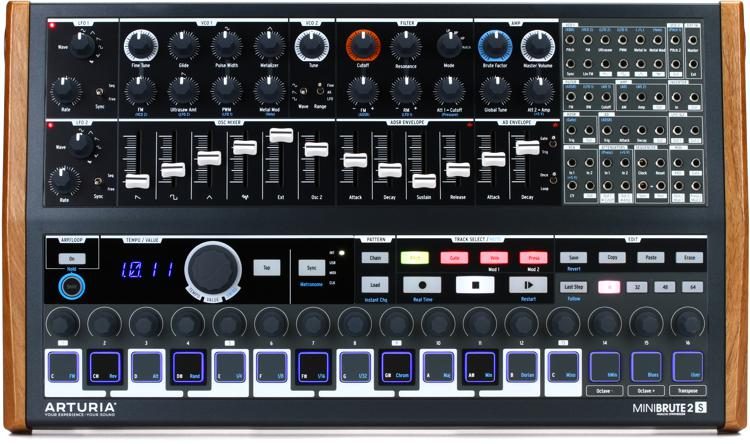
Let's start with the Arturia MiniBrute 2S. The MiniBrute 2S is a monophonic synthesizer that features an arpeggiator and step sequencer with up to 64 different rhythmic patterns to choose from, along with 2 LFOs for modulation possibilities.
Remember that the MiniBrute 2S is the master in this system. This means it is really important to know how to set the tempo and start/stop playback on this device. See figure 1 for a visual representation of where to find these important controls.
Because this is not a synthesis tutorial, we'll stay away from covering the basics of this device. However, it is important to remember that all of the devices in the Beat-Making Station are being sent MIDI clock data from the Master. This means the arpeggiator and sequencer in the MiniBrute 2S will be in time with the beats programmed in the drum machines when the system is running/playing. Take advantage of this feature by using the step sequencer and arpeggiator in the MiniBrute 2S so you can get a full rhythm section running when you press play!
The MiniBrute 2S is configured to send and receive on MIDI Channel 4.
CLICK HERE for the official MiniBrute 2S Impact manual.
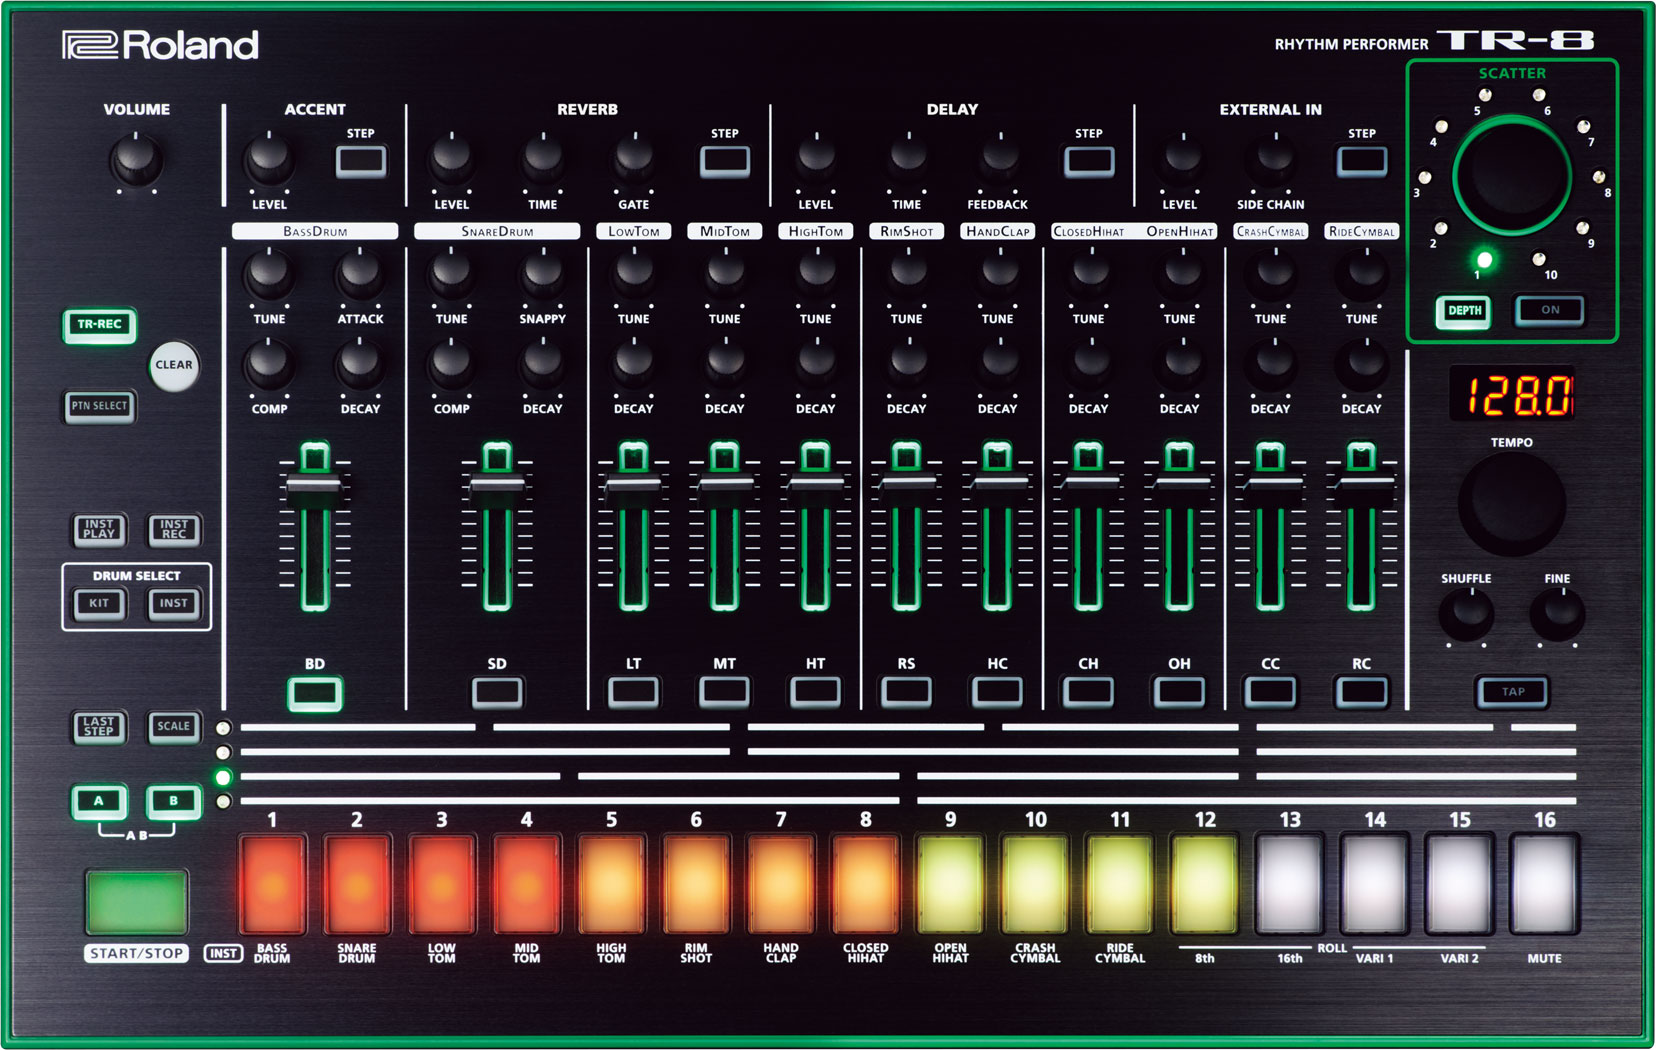
ROLAND TR-8 IRA RHYTHM PERFORMER
The Roland TR-8 is the parent of the TR-8S. For this reason, it can be described as a slightly simpler version of the TR-8S. It uses the same process for clearing and creating patterns. One difference to note is that the TR-8 does not include an LCD screen for selecting kits. Rather, you can select a kit by holding down the DRUM SELECT modifier key (found on the right-center of the interface) and pressing one of the 16 rainbow sequence steps.
PRO TIP: Try out the TR-8's SCATTER parameter! It works by chopping up the master output of the device into more complex variations. Moving the SCATTER dial (found on the top right of the device above the LDC screen) to the right will add more depth and complexity to the scatter function and make even a simple beat into something super interesting.
The TR-8 is sent to send and receive on MIDI Channel 2.
CLICK HERE for the official TR-8 manual.
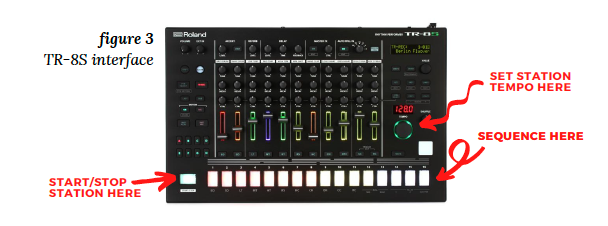
ROLAND TR-8S IRA RHYTHM PERFORMER
The TR-8S comes with 84 pre-configured kits and 342 onboard samples to choose from. To select a kit, press the KIT button and turn the VALUE knob to scroll through available kits on the LCD screen.
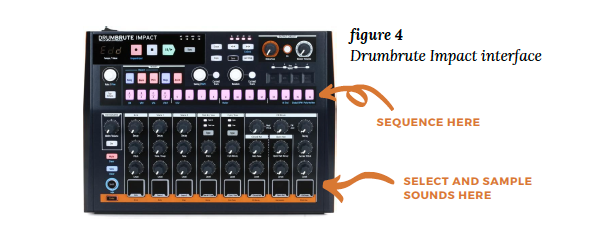
ARTURIA DRUMBRUTE IMPACT
The DrumBrute Impact is a fully analog drum machine as opposed to the two Roland devices in this system, which uses audio samples of classic synthesized drum sounds.
Because it is analog, the DrumBrute is all about sound shaping. Rather than pulling up kits and samples, for this device, use the Level, Pitch, and Decay knobs to shape each of the 10 available sounds and then sequence them using the sequencer.
Before you even start running the Beat-Making Station you can playback each of the sounds in the DrumBrute using the corresponding pads. Then, you can jump up to the sequencer (line of 16 small buttons just above the sound controls) and start sequencing! see figure 4 for a visual representation of these parameters.
There are a few different ways to enter patterns into the DrumBrute, but the most "drum-machine-esque" way is to select the sound you want to enter into the sequence by hitting its corresponding drum pad and then using the 16-step sequencer to add iterations of the selected sound into the pattern.
The DrumBrute Impact is sent to send and receive on MIDI Channel 1.
CLICK HERE for the official DrumBrute Impact manual.
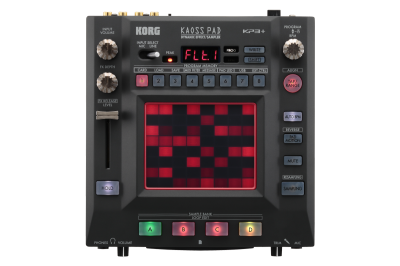
The Beat-Making Station really has something to flex when it comes to the Kaoss Pad. Of course, the Kaoss Pad is cool on its own, but it becomes 200 times cooler when used as a send/return effect! The interface used in the Beat-Making Station allows the master output to be sent out to the Kaoss Pad and then sent back to the interface to be mixed in with the dry master mix!
The Kaoss Pad is a granular effects processing device that basically glitches out an incoming audio signal by applying tons of cool rhythmic and spatial effects to the sound. Remember, these effects are synced to the master clock, too! The Kaoss Pad is definitely one of those devices which is effective whether or not you "know how to use it." So start moving your finger around on that XY pad, and you'll be good to go. But of course, if you're interested in diving deeper...
CLICK HERE for the official Korg Kaoss Pad KP3+ manual.
Okay, so you've made a really cool beat, and you want to capture it. Maybe you want to save the MIDI for later or use a MIDI sequence in your DAW to trigger the Bass Station. It's possible! All you need to do is place your laptop on the stand and plug it into the USB cable that is chilling there. The USB cable at this station can transmit MIDI and audio signals, meaning you can get your DAW's clock synced up with the system as well!
This should work with any DAW, but let's go over Logic and Ableton, as they are two of the most popular.
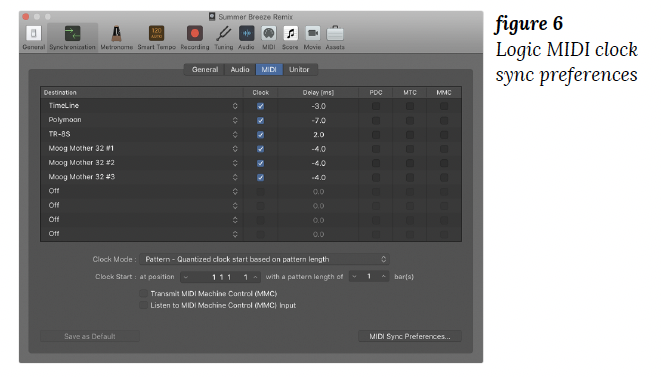
If you're having trouble getting your Logic project tempo-synced with the Beat-Making Station, navigate to File > Project Settings > Synchronization > MIDI and make sure the interface's Clock box is checked. This will turn Logic into the Master Clock for the Station, meaning when you press play in Logic, all of the sequencers on the station will play.
From here, you can create an External MIDI track to capture MIDI from the interface or create an Audio track to capture audio.
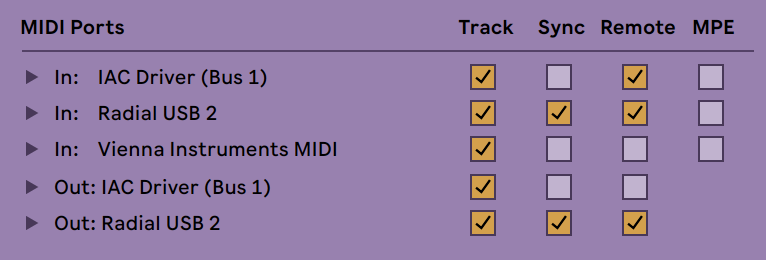
If you're using Ableton, navigate to Preferences > Link MIDI and make sure both the Sync in and out are selected from the Radial USB 2 Device.
If you want to make Ableton the Master clock, Select the EXT button at the top of the DAW in Ableton's transport section. You'll know it's on if it is highlighted yellow as pictured below.
![]()
From here, you can create a MIDI track to capture MIDI data from the station or create an Audio track to capture audio.