Logic Auto Sampler: Sampling A Hardware Synthesizer
Introduction
Logic’s Auto Sampler is an incredible device that has been around for a really long time! It just recently got an interface update with Logic 10.5 and it provides a super cool way to capture hardware synth patches or save software instrument stacks with effects into one sampled instrument!
Auto Sampler basically takes an audio signal and uses internal MIDI to trigger an instrument. It then uses multisampling to save audio samples for each note at different velocities, resulting in a sampler instrument that can be loaded into Logic’s Sampler and played as a software instrument!
This is really cool for using hardware synths because it allows us to create patches on hardware devices and then save them to our computers and play them like software synths! Not only can you take that analog sound on the go, but you can also get around the pesky fact that hardware synths don’t have a lot of space to store patches onboard. Auto Sampler helps you save your analog patches for later so you can keep making cool music with the patches you create without worrying about losing them!
Okay, let’s jump into the process of sampling a hardware synthesizer with Auto Sampler!
Step One: Audio and MIDI Routing
Routing for Auto Sampler is the most difficult part of using the device. We often think of hardware and software synths as completely different realms and many of us don’t have experience integrating the two. Once you get it, however, it’s super simple!
It is important to remember that in order for this to work we need to set up our routing in Logic so that Logic can send MIDI to our hardware synth and then receive audio from it.
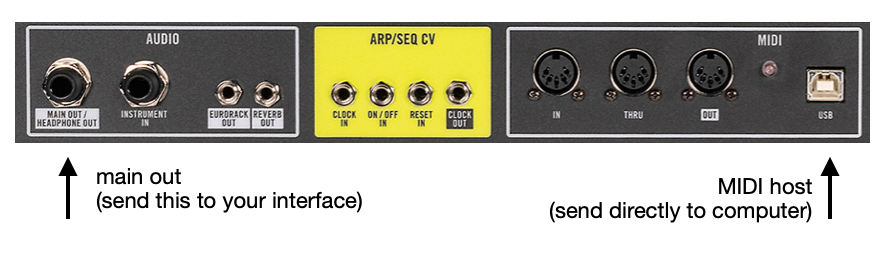
Depending on the hardware synth you are using the configuration can change, but for most modern synthesizers you will probably need:
An audio interface takes the mono quarter-inch master output from your synthesizer as its input and sends it to your computer.
A MIDI host to USB cable taking communicating MIDI data between the synth and your computer.
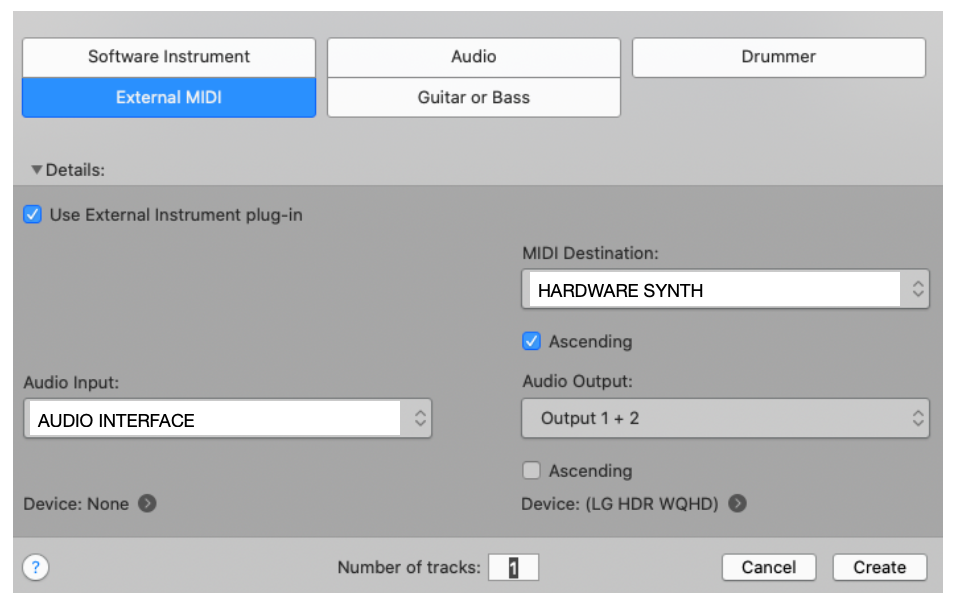
Now that your synth is plugged in, create an External Instrument track in Logic.
Make sure you set your Audio Input as the name of your audio interface, the Audio Output as whatever output you are listening to logic with (most likely output 1 + 2), and your MIDI Destination as the name of your hardware synthesizer.
At this point, if you play something on your external synth you should be able to hear it in your headphones!
If you don’t hear anything, check that the MIDI Channel on your external instrument track is set to “All” and that the External Instrument track is record enabled.

Step Two: Add Auto Sampler
Auto Sampler works as an audio effect plugin on audio, external instrument, or software instrument track. The placement of the plugin in the signal chain matters, as any plugins/effects placed after the Auto Sampler in the chain, will not be captured.
When sampling hardware synths with Auto Sampler it is probably best to avoid putting any other effects on the chain to start. This way you are sampling the pure sound of the synth patch that you made. You can always add effect plugins to your sampler instrument once you’re finished sampling.
Auto Sampler is located under the Utility category in the plugin dropdown menu. Add this to your chain and you are ready to go!
Once Auto Sampler is open, try clicking the keys on the screen to see if your external synth is receiving MIDI data from your computer. If your routing is correct, you should hear your synth playing back when you do this!
Step Three: Choose Your Settings
Auto Sampler has a lot of parameters that can be altered to change the way that your hardware synth is sampled.
You can decide the range of notes that are sampled by changing the Range Start and Range End notes. You can also change how often notes are sampled. The smaller the number of semitones you choose for Sample Every, the more precise your sampler instrument will be, but the bigger the file will be and the longer it will take to sample.
The Round Robin parameter adds the option to have each note of your synth sampled multiple times to make it more “analog-sounding.” Some analog synths don’t play perfectly every time, so enabling a few rounds of sampling can create a more realistic sampler instrument.
The Sustain parameter controls how long the MIDI notes sent to the hardware synth will be held down. If you have a staccato pluck as your patch, this probably doesn’t need to be that long. However, if you are sampling a pad that has a lot of change over time, it would probably be better to stick will a decently long sustain time.
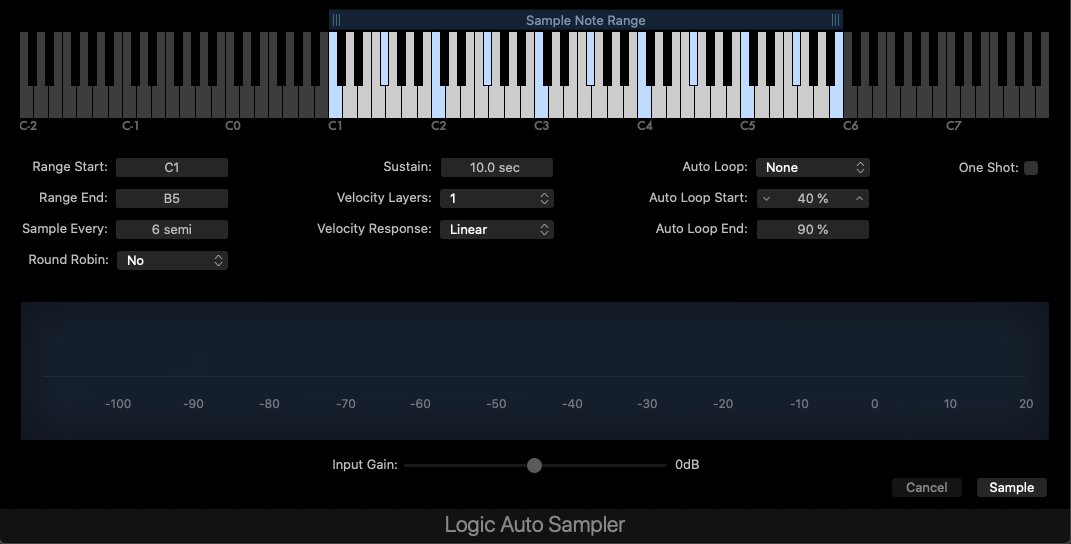
The Velocity Layers parameter refers to how many different velocities are sampled from your instrument. Many synth patches have different sounds for different velocities, and multisampling allows you to map these velocities to a sampled instrument! Depending on your instrument, you probably want to have at least three or four velocity layers to create a more dynamic sampler instrument.
Velocity Response refers to the velocity curve of the instrument. In most cases, Linear is the best bet for this one.
If you are sampling a sustaining patch, you’ll probably want to use an Auto Looping when you sample your synth. This means that Logic will analyze your synth’s audio input and select the best points for it to loop when it plays back as a sampler instrument. This is important because it allows you to playback your sampled instrument for as long as you want later without being restricted to the length you choose as your Sustain value.
In my experience, the best setting for Auto Looping is Search with XFade.
From here, you can decide your loop start and end points. If your Sustain length is 10 seconds, then an Auto Loop Start point of 40% will be at 4 seconds. The longer the sample, the farther apart your loop Start and End points can be. Be cognoscente of how your patch changes over time when selecting these points!!
Step Four: SAMPLE!
From here, all you need to do is press Sample and Logic will do all the work for you! Once it is done sampling, save your sampler instrument somewhere on your computer, name it accordingly, and load it up into Sampler!!