Logic's Inspector: The Complete Guide
Introduction!
The Inspector is one of the most important sections of Logic Pro's user interface. From helping out with quick tasks like transposing an audio region to helping avoid the scatteredness of the mixer, the inspector packs loads of utility into one small strip of screen space.
The Inspector can definitely be quite counterintuitive for new Logic users because some of the most useful controls in the window are quite small and can be easily missed. But once you know where to look, taking advantage of the Inspector can save a whole lot of time and energy so you can focus on the fun stuff.
P.S. This article contains some extra PRO TIPS throughout! Look for the yellow highlight for some easy ways to create unique sounds or boost creativity!
So... which section are you referring to again?
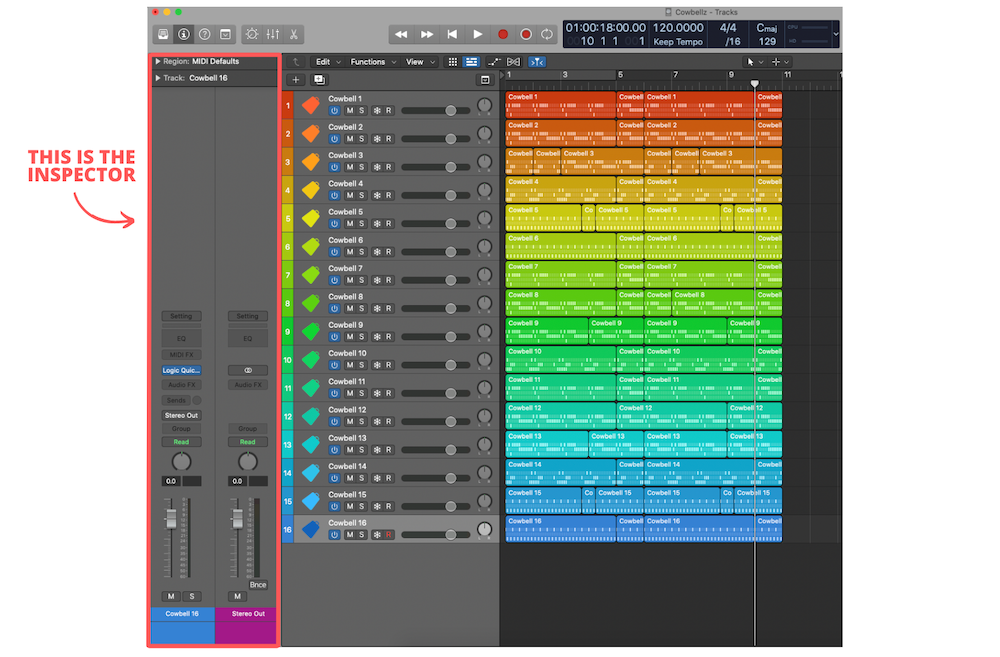
The region and track Inspectors can be shown by clicking the ⓘ button on the top left corner of the screen or by pressing the i key on your computer keyboard.
Regions vs Tracks
When talking about the Inspector it is important to know the vocabulary involved, more specifically, the difference between a region and a track.
A region (also often referred to as a clip) holds audio or MIDI data and lives within a track on the timeline.

You can also access the region inspector as a pop-out window with the option + R key command.
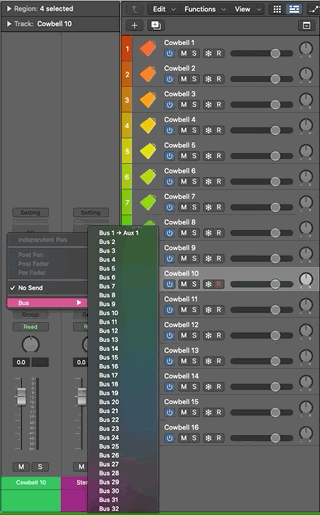
Quickly Access Relevant Channel Strips
The most prevalent and definitely the most useful element of the Inspector is its ability to provide quick access to channel strips associated with a selected track header. Without this feature, it would be necessary to constantly have the mixer window open (or constantly be switching between windows and configurations) in order to make changes to software instrument settings, plugins, and routings. Luckily, we don't have this issue! With the Inspector it is super easy to access these elements by simply selecting a given track header and heading over to the Inspector.
My favorite thing about the Inspector is that the right-most strip that appears there is set to different output or aux tracks based on what you click on the left-most strip, which is the channel strip of the currently selected track header.
For example, if you were to select a track and adjust one of its sends (left-most channel strip), the right-most strip would automatically change to display the channel strip of the aux track associated with that send!
This is a life-saver because it keeps you from having to constantly be opening the mixer and searching through channel strips for your associated aux track!
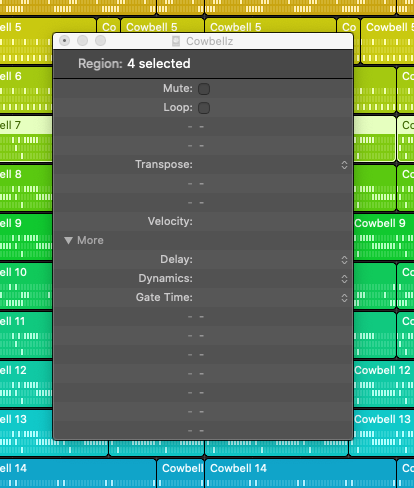
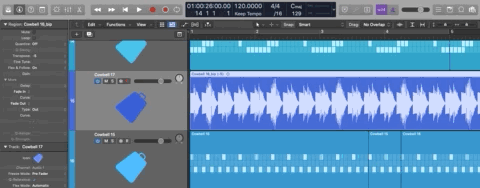
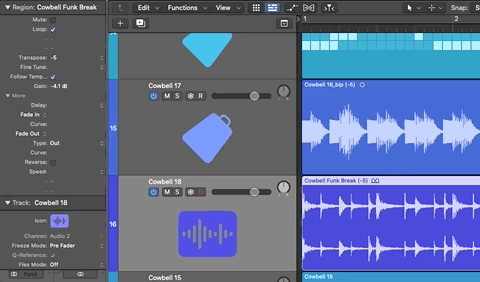
Region Inspector
The Region Inspector is the top-most dropdown in the Inspector. This section's parameters change based on what type of region is selected (audio, MIDI, pattern, or Apple Loop). Let's take a look at everything you can do there!
NOTE: The region Inspector controls affect the playback of a region, but not the region itself. This means changes made with the inspector are easily reversible and that if your project is playing back and you make a change using the region Inspector, you can hear the changes in real-time as you make them!
Mute or Loop Regions
All types of regions have Inspector controls which allow you to switch on or off looping on regions and mute/unmute them.
Transpose Regions
You might not realize that it's super easy to transpose audio files or MIDI files, and Logic does a great job with this! If you ever pull an audio sample into your project and it is in a different key from the project it is super easy to just head to the Inspector and transpose it by a few semitones. This works for all types of regions, so if you ever need to transpose your entire track you can actually select multiple regions, or even multiple tracks, and offset their transposition value all at the same time.
The transposition feature is in semitones, and you can double click and enter your own transposition value in semitones (add "-" for lower transpositions) or click and drag to change the value.
Something I love about this feature is the way that any region transposed using the Inspector shows the number of semitones it has been transposed by next to the region title! This provides a nice visual representation and an easy way to check if you've transposed a region and by how much.
In the same vein, it is also possible to fine-tune a region using the Inspector. This refers to an offset by cents rather than semitones. This is helpful for making sure that regions are in tune with the rest of the track.
PRO TIP: Create low octave doubles of your vocals to fill out the sound by transposing them down by 12 semitones. This is a popular effect in today's contemporary music scene and it is super easy to do with the Inspector!
Flex and Follow
For audio regions, the Inspector has a convenient way to turn on Flex (Logic's timing and tuning feature) and select whether you want to align bars or align bars and beats. Doing this from the Inspector is quick and easy and Logic does all the work for you, analyzing the region and its transients and then snapping them to the nearest bar or beat. This feature is super useful, but it's Logic's algorithm doing the work, so it works best for drum or guitar regions. It's not so helpful for vocals or pads because these types of regions have less strong transients. As a general rule, if you want accuracy, you should probably open up the audio editor and check Logic's work.
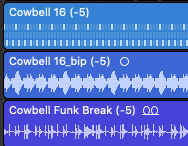
Clip Gain
For audio, it is super important to be able to change the gain or a region. Clip gain is so important, but Logic's clip gain control is hidden as a tiny parameter in the Inspector! Changing this value can be super helpful for gain-matching regions and the like.
It is important to note that clip/region gain is pre-fader and pre-plugin. This means that it is the first gain/volume control that exists and it affects only the selected region(s), not the entire track. What's cool about this is that you can actually see the waveform changing as you adjust the clip gain! So helpful and definitely a go-to control.
PRO TIP: Adjust the level of breaths and sibilance using clip gain. All you need to do is chop up your vocal and isolate breaths or consonants into their own little region, turn down the gain, and add small crossfades.
Velocity Offset
If you ever need a quick way to offset the velocities of every note in a MIDI or pattern region, it is super easy to do with the velocity parameter in the Inspector.
Delay Audio and MIDI Regions
This one might seem unhelpful, but it can actually be super useful in many situations, especially when it comes to aligning audio or MIDI clips with different elements in an arrangement. This parameter offsets the timing of a clip in ticks without changing the position of the region, only the playback, which is super nice for keeping your regions cleanly aligned and organized!
PRO TIP: Widen your sound by duplicating it and hard panning each region and delaying one of the regions by a few ticks and fine-tuning it up or down a few cents! This creates subtle differences in the left and right sides and makes it sound like your sound is doubled!
Velocity Dynamics
Do you ever need to control the range of velocities in your MIDI regions? The Dynamics parameter in the inspector allows you to compress or expand the range of velocities in a given MIDI or pattern region by a certain percentage. Pull the range all the way down to Fixed and all velocities will be set to 64.
Fade in and Fade Out
When you add a fade on a clip there are actually more controls you can use to adjust the fade in the Inspector! There is an option to adjust the curve shape of the fades and an option to replace them with a speed up or slow down. When you change a fade out to a slow down, for example, the fade will become orange to signify that this change has been made. This feature is so cool because it sounds like a tape start/stop!
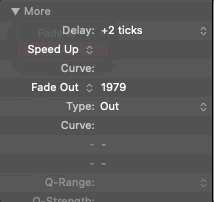
PRO TIP: Grab a random one-shot sample and add a long fade out to it. Then run over to the Inspector and swap the fade out for a slow down. Now you've got a really cool one-shot tape stop sound effect to use in your track!
Reverse Audio Clips
Reversing audio is super useful for creative effects like making custom risers. So much can be done with this feature and the possibilities are endless! All you need to do is press the more dropdown in the region inspector and check the reverse box!
PRO TIP: Try creating reverse piano chords or reversing a cymbal to create risers for your tracks! Even reverb tails can be reversed for really cool risers!
Apple Loop Playback Speed
If you use Apple Loops (which you definitely should), you can actually double or half the playback speed of the loop region using the Inspector. If an Apple Loop is selected, an option for speed appears in the Inspector where you can reduce up to an eighth of the speed or play it back up to eight times the speed. This doesn't even alter the pitch of the loop!
PRO TIP: Try creating an EDM-style build-up by doubling the speed of a percussion loop at every bar as you approach a drop!
Quantization
Both audio and MIDI regions have quantization options within the Inspector (Flex and Follow must be on for audio regions in order for these options to show).
Q-Range defines which notes are quantized based on how close they are to the grid. When Q-range is set to 0, every note is quantized. With positive values, any notes outside of the set range (farthest away from the grid position) are quantized, but those that are closer are left where they are. At negative values, the opposite occurs.
Q-Strength defines how much a note is quantized. For 100% the notes are fully quantized and for 0% they are left unchanged.
Q-Swing allows you to set a percentage value to alter the position of every second point in the current quantization grid. With values over 50%, beats are delayed, and with values under 50% beats are pre-delayed. Practically, you’ll probably be sticking to a range between 50% and 75% to create a natural swing feel in your MIDI region.
Q-Flam works for MIDI regions and spreads notes in chords out into short arpeggios, creating a flam effect. Positive values produce an ascending flam and negatives a descending one. This can be cool for snare sounds or making a chord more humanized by using a small value.
Gate Time
This parameter refers to how long a note is "held down". It can be helpful for quickly making a MIDI performance more staccato or legato without needing to open the piano roll and edit all the note lengths.
Outro
Can you believe that we didn't even cover all of the Inspector's parameters? If you are interested in learning even more about the Inspector and getting specific details about each parameter, be sure to reference Apple's Logic User Manual. Thanks so much for reading! I hope you learned something today!`