10 Ableton Tips to Improve Your Workflow
No matter what DAW you use, having an efficient workflow is extremely important. Not only does it save you time, but it also allows you to look and feel more professional and advanced when working with others. Not to mention, it lets you put all of your brain’s energy into creativity instead of worrying about the technical stuff. It just feels good to learn tips and tricks to help you become faster and more precise while producing, editing, and mixing.
With a simple one-key command for switching between the session and arrangement view, the ability to see and edit all of your plugin parameters at once, and a beautifully organized browser, Ableton really has my heart when it comes to ease of use and workflow. I am also a frequent user of Logic and Pro Tools, and although both of them have their own unique and superior features, I definitely think Ableton is the most convenient DAW for getting things done quickly and efficiently, especially for sound design and production.
There is always more to learn! Whether you are a beginner Ableton user or a senior citizen of Live-ville, these workflow tips and hacks will help you improve your productivity and creativity when working with Ableton Live.
1. MIDI to audio
For the longest time, I was so annoyed with Ableton because I thought there was no easy way to bounce a MIDI track to the audio while still saving the audio for later. Little did I know that this feature does indeed exist, although it is quite hidden and quite counterintuitive in my opinion.
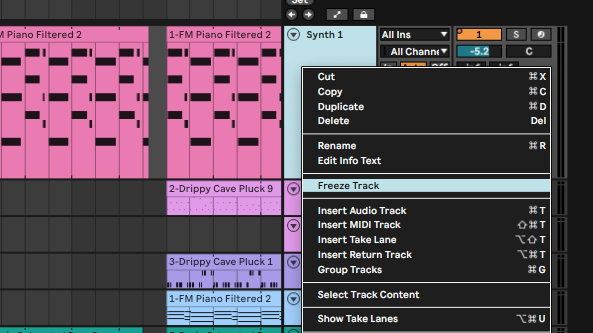
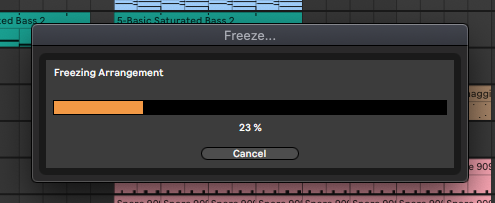
To convert A MIDI track to audio in Live, there is a feature called freezing and flattening which allows you to freeze a track (render the MIDI to audio for playback) and then bounce it to audio in place (converting the track fully to audio, replacing the MIDI data completely). This is super inconvenient! What if I need my MIDI for later?!
What I would always do was I would duplicate the MIDI track I wanted to convert to audio, freeze and flatten one of them, and then mute the other so that I could archive it or save it for later.
However, when a MIDI track is frozen, you can actually just hold the option key and drag the MIDI clip from a frozen track into an audio track, and BAM, you have an audio version of your MIDI track! Be careful, though, because you can easily overwrite audio files this way! I recommend creating a new audio track before option + dragging the frozen MIDI track.
2. H and W (Key Commands)
One-key shortcuts are my favorite. They become second nature so easily and are so much easier to learn and retain because there are no modifier keys to mix up. Although Ableton’s key commands are fairly minimal, there are a few one-key commands which are extremely useful, two of which involve adjusting the height and width of the arrangement to help you easily get a nice overview of what’s going on with your project without needing to worry about zoom tools or scrolling.
- Hitting the H key evenly spaces track heights to fit the available screen space so that you can see all of your tracks on the screen! (H for height)
- Hitting the W key on your keyboard brings the entire arrangement into view (W for width)
I think these are awesome because they are super easy to remember!
3. View and edit multiple MIDI clips in one piano roll view
Here’s another tiny thing that will clean up your workflow so much. Normally, you click on a MIDI clip, the piano roll opens, and you edit the MIDI. Then, you move onto the next one, clicking on that one and editing the MIDI. Right?
Well, for the longest time my answer would have been, RIGHT! Now, it is a big fat WRONG!
You can actually edit multiple MIDI clips at a time in the piano roll! All you need to do is select two MIDI clips at once (command + select multiple clips) and you are able to see the MIDI notes from the different clips all at once in the piano roll.

There are a few different ways to format the piano roll in this case. When you first select multiple MIDI clips at once, you will see all the notes colored depending on the clip’s color. In the example image below, we see four different colors, each corresponding to its own MIDI clip. We also see the color strips at the top letting us know that four different clips are selected.
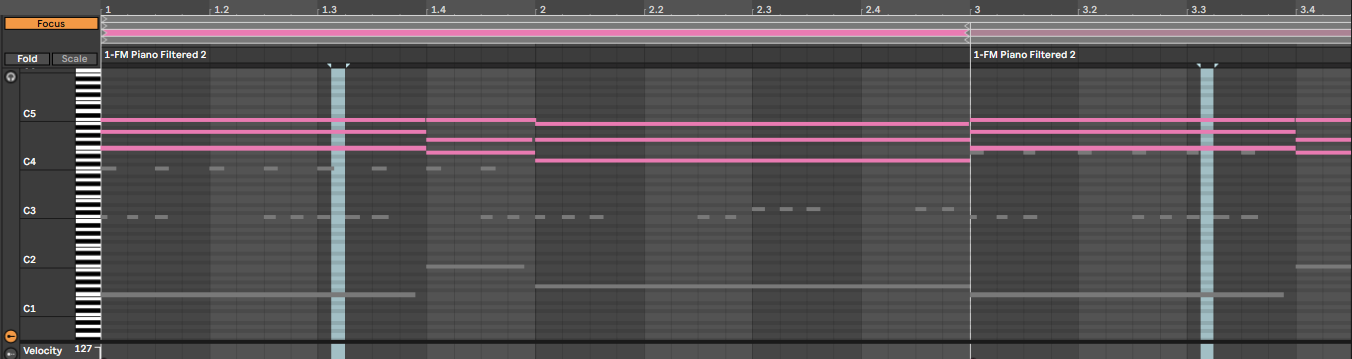
If we click on the focus button on the left of the color bars, we can focus on one clip’s notes at a time while seeing the rest in a greyed-out form. We can switch between clips by selecting their color bar on the top of the piano roll.
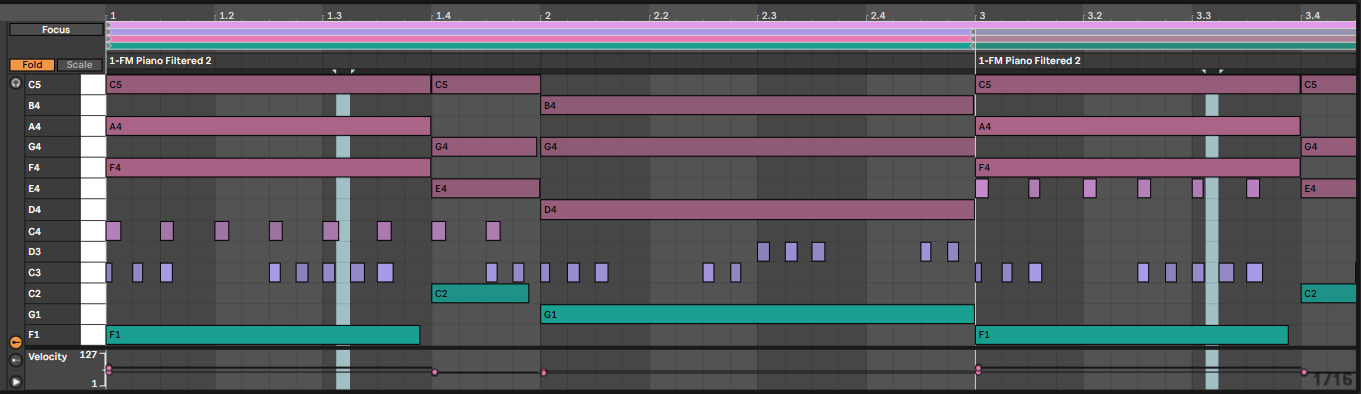
As you can see here, I have also used the Fold option to get rid of all of the pesky unused notes. This is super useful for when you have different drum tracks with MIDI notes but want to see them all at once in a clean, easy-to-look-at form.
4. Deactivate MIDI notes
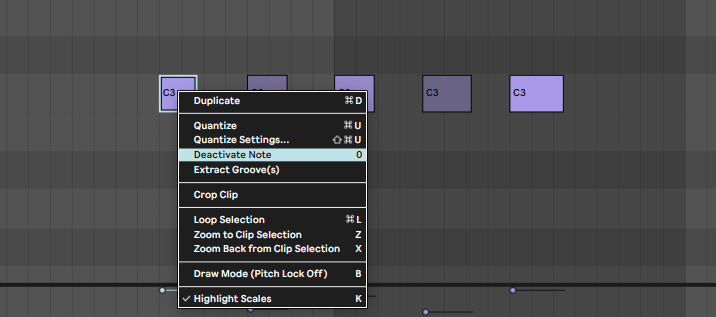
In the same vein as the previous tip, Ableton actually has a feature called “Deactivate MIDI note.” Basically, this allows you to mute notes.
All you need to do to deactivate a note is select it (or multiple) and press 0 on your keyboard! (You can also right-click and select ‘Deactivate Note’ but it’s much more fun with the key command). Of course, 0 also re-activates the notes if you need to bring ‘em back.
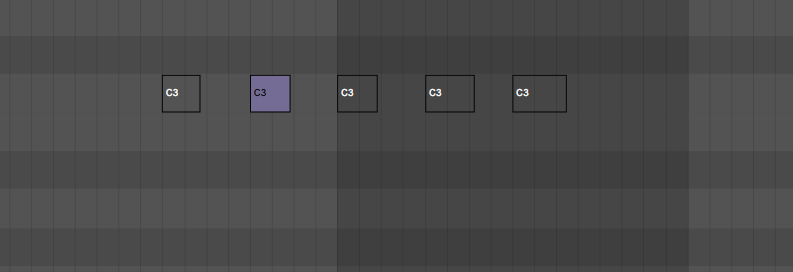
Honestly, this feature is useful in so many different situations! So often I want to hear a chord without its tensions but I don’t want to delete the note because I don’t want to forget what I had there! This way, there is an easy way to toggle, save, or archive notes in your MIDI clips! So amazing, and not to mention quick! I am sure there are tons of uses for this which I haven’t even thought about yet!
5. Saving defaults
Ableton lets you save defaults for almost everything. You can configure the color, title, and settings of new tracks. You can save defaults for any Ableton device. You can save default projects, and even create a collection of templates with Live 11.
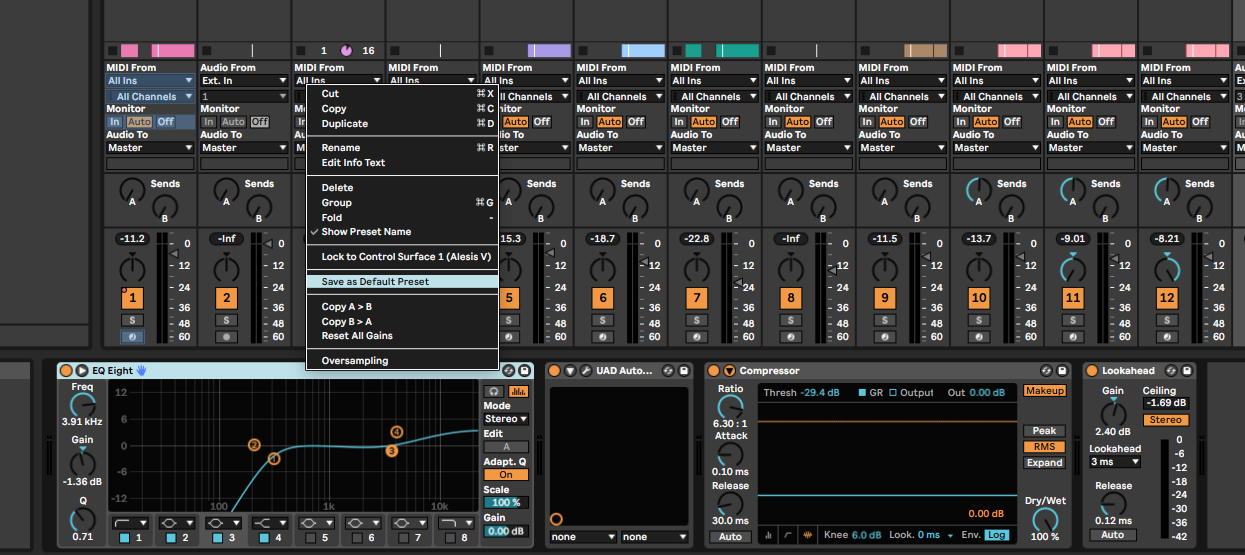
There is so much to be said about this, but I think this is more of a broad workflow tip that each person really needs to explore for their own needs.
To save defaults for devices and tracks, simply right-click on the device/track with the settings you want to save as the default and select “save as default...” on the bottom of the dropdown menu. For devices, the default preset will apply whenever the device is added to a track; presets will still be maintained. For tracks, any new tracks and any tracks created when Ableton creates a new live set (assuming you haven’t created a default live set) will be loaded with the settings you saved as the default.
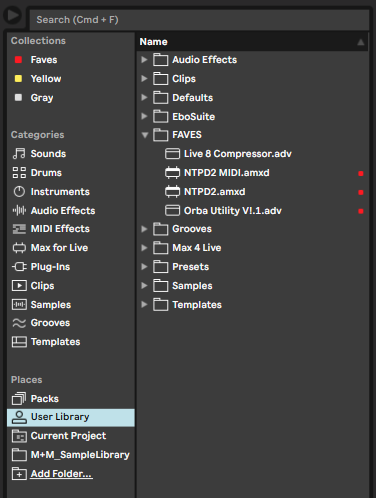
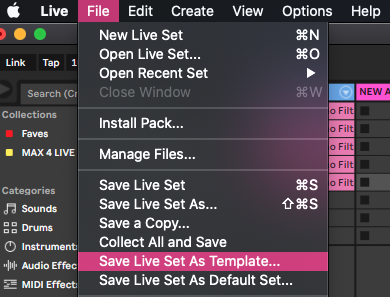
To save templates (Live 11 only), simply navigate to file → save live set as template. Templates will be saved in the Browser under User Library → Templates. It’s easy to re-create this feature in earlier versions of Live by saving live sets into the user library to use as templates. Just make sure you save the live set as when using the “mock” version of templates.
You can also save a default live set under the file menu.
6. Plugin Window Preferences
Ableton’s default manner of handling plugin windows is not exactly… amazing.
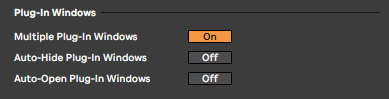
However, there are ways to change Ableton’s plugin window behavior in preferences. Just navigate to the Plugins section of preferences and decide how you want Ableton to handle plugin windows. I typically keep “auto-hide” and “auto-open” off, but these settings can be helpful for workflow if you want to quickly open plugin windows without needing to find specific plugins in a chain and open them all!
7. Automate volume with utility instead of the volume fader
This one is fairly self-explanatory, but if you want to be able to easily automate your track’s volume in a relative fashion, try throwing a utility plugin on the end of your track’s chain and automating the utility gain rather than the volume fader. This way when you are mixing you can control the overall volume of the track more easily and not worry about the automation. Just make sure you leave yourself plenty of headroom so you don’t get clipping!!!
8. Get a notepad device!
One thing I love about Logic and Pro Tools is that you can add track comments and project notes. I love writing notes to myself, annotating my project, and writing out lyrics and ideas all throughout my project. But Ableton doesn’t come with a notepad device! It definitely stinks, but there are tons of free Max for Live devices out there that the Ableton community has created to address this issue.
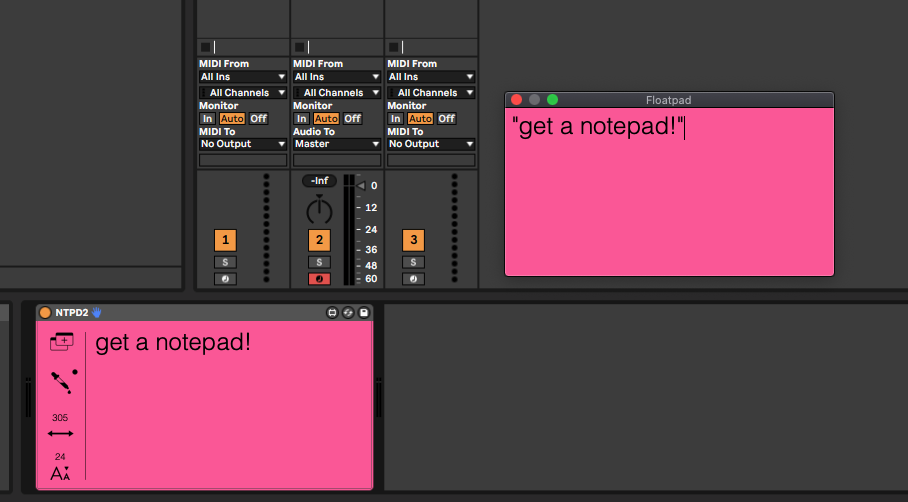
My personal favorite is NTPD by ELEPHNT. There is a free version and a 10 dollar version. I think it’s worth 10 dollars so I got the full version, but I used the free one for months before upgrading!
9. Route reference tracks parallel to the master track
I can’t remember where I read this but I think my brain exploded because it is such a simple routing trick but it is simply so helpful.
Basically, I tend to put reference tracks inside my Ableton projects all the time, but sometimes I don’t want them to be played back with the Master effects on them, especially if they are mastering references. So I always played them in a separate application. But the thing is, there is a simple way to route tracks parallel to the Master so that they skip the master and go straight to the output.
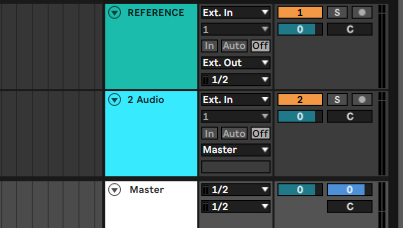
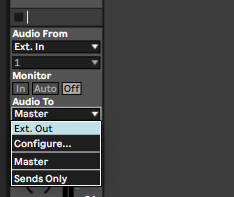
All you have to do is go to a track and select ‘Ext. Out’ as the output of the track. Then, make sure that the external output channels selected are the same as the Master’s output. Then all you need to do is unmute and solo the reference and you will hear it without any processing or master track processing!
10. Make the most of the browser!
When we talk about workflow, we really are talking about recognizing your habits and figuring out ways to make them faster and more efficient. This is why saving presets, using the user library, and adding folders to the browser is SO important to workflow.
If you know there is a folder that you access often, maybe a folder of samples or projects, add it to Ableton’s browser!
If you know that you use a specific audio effect chain, create a rack and save it to your user library! There is so much to be said about recognizing patterns and making them easier for yourself by saving them for future projects. I feel like no one uses this trick and it is SOOO important!
That’s all for now! Keep learning and improving and good luck in all of your creative musical endeavors!
- Maya