Exploring Ableton's Delay Plugins

Whether you are sound designing, mixing, or producing, using time-based effects like a delay is a necessity. There are endlessly creative and practical applications of delay effects, and Ableton Live’s developers do an amazing job of including a diverse and functional collection of delay plugins with their software package.
This article includes a detailed overview of each delay-related plugin in Ableton Live, with parameter explanations and ideas for how to use each plugin in your productions.
Delay
First off, we’ve got a classic delay plugin which, surprisingly enough, is called “Delay.” Although this plugin’s name seems to imply simplicity, there is tons of functionality packed into this small but mighty effect.
Delay features two separate channels (left and right) which can be linked for equal delay timing on both sides or unlinked for separate timing. To sync the delay with the song’s tempo, simply activate the sync switch. Below the sync switch, there are 8 different numbers for each channel which represent the delay time in 16th notes. For a quarter note delay, select “4” and so on. For un-synced delay, simply turn off the sync switch and adjust the time percentage (in milliseconds) which sits underneath the numbers in each channel’s column.
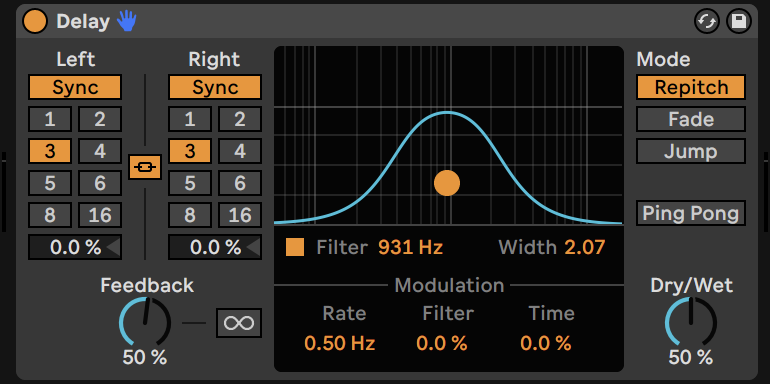
Delay also features a bandpass filter which filters the input signal when activated to result in a filtered delay following an unfiltered dry signal. Below the bandpass filter lives the modulation parameters which control an LFO that can modulate the filter’s frequency and/or the delay time. The rate parameter controls the frequency/rate of the LFO itself. The filter parameter adjusts the amount of modulation applied to the filter, and the time parameter adjusts the amount of modulation applied to the delay time.
Delay has tons of potential for creating creative effects. One cool aspect of the device is its freeze parameter, which when activated, stops responding to the input signal and continuously feeds the same signal (at the point where it was activated) back into the delay. The freeze parameter features an infinity symbol to represent the endless repetitive delay created by its use.
On the far right of the plugin’s interface, there is a section where you can select the plugin’s “mode.” This model dictates the device’s behavior when the delay time is changed as the plugin is receiving input.
These transition modes include the following:
- Repitch emulates the behavior of an old tape machine, which results in a change in pitch when the delay time is changed.
- Fade will crossfade between the old and new delay times
- Jump will jump directly to the new delay time.
Creative Applications for Delay
There are endless creative possibilities with Delay, but these are a few I have tried out!
- Create a chorus effect using only the Delay device!
- Delay the left and right channels by only a few milliseconds and bringing the dry-wet down to let some dry signal through. Enable the bandpass filter and adjust the width slider to separate the left and right channels even more. Set the rate slider based on the rate of chorus you are going for and set the time slider below 50% with a repitch transition mode and the ping pong switch enabled. This creates a chorus/modulation effect because the sound is being widened and modulated through the use of delay, just as a typical chorus plugin would do.
- One of the quickest and easiest ways to make a sound wider in your mix is to delay one channel from the other by less than 40 milliseconds.
- This technique works because of the Haas Effect, which explains that the human brain’s delay threshold lies at 40 milliseconds and above and that any two sounds which fall closer together than 40 milliseconds will be perceived as one sound. To use Delay to achieve this effect and widen your sound, simply set the dry/wet knob at 100%, unlink the left and right channels, and ensure that one of the two channels has a delay time of less than 40ms while the other remains unaffected by the delay.
- Have you ever wanted to make your sound like it is slowing down like it would if it were on a stopping tape? This effect can be really cool to use in productions, especially for transitions.
- Because classic tape machines change pitch slowed down or sped up, using the repitch mode, which emulates tape machine behavior when the delay time is altered, can be used to create a tape slow down when the delay time is automated. To create the effect, simply link the left and right channels and put the plugin in repitch mode. From here automate the delay time to quickly change from a low to a high value at whichever point you want the tape slow down effect to occur. This can be done in the opposite way as well to create tape a speed-up effect.
Echo
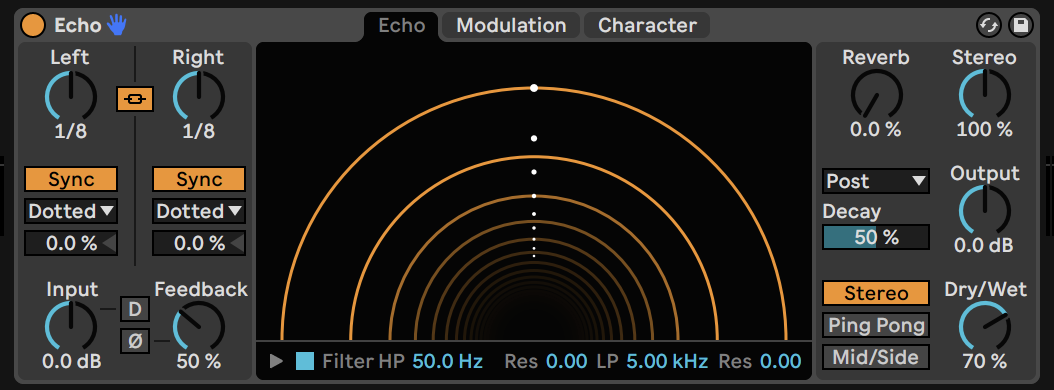
The words echo and delay are often used interchangeably, especially by those who are not music production gurus. Think of echo as more of a spatial, natural effect, like when you sing into a canyon and hear yourself back. Echoes are a type of delay which are designed to sound more natural and realistic. Yet, in the case of Ableton’s Echo, things can get pretty wacky and extreme, allowing for the creation of effects that are literally out of this world. Ableton’s Echo plugin is only available in the Suite version.
Echo is a delay that is based on modulating two separate channels. These channels can be mid/side or left/right depending on the model chosen. Just like in the Delay plugin, both channels can be linked or unlinked. The basics are similar to the Delay plugin, but it gets pretty crazy when it comes to the different tabs in the plugin.
The Echo tab shows a visual representation of both channels. It shows the timing of each delayed signal in comparison to white dots in the center which represent 8th notes. You can actually move the yellow lines in this visual to change the timing of each individual delay line. Below the “tunnel” visual there is a toggle to open a filter visualization which allows you to select filter cutoff and resonance for the low pass and high pass filters which are built into the effect.
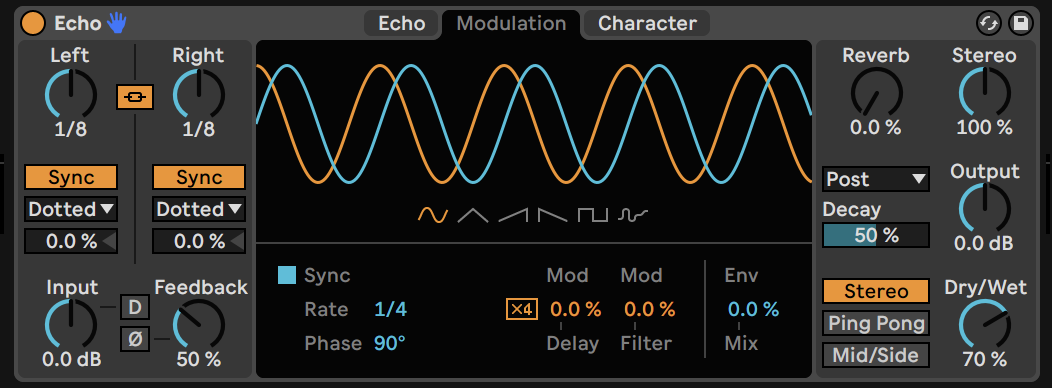
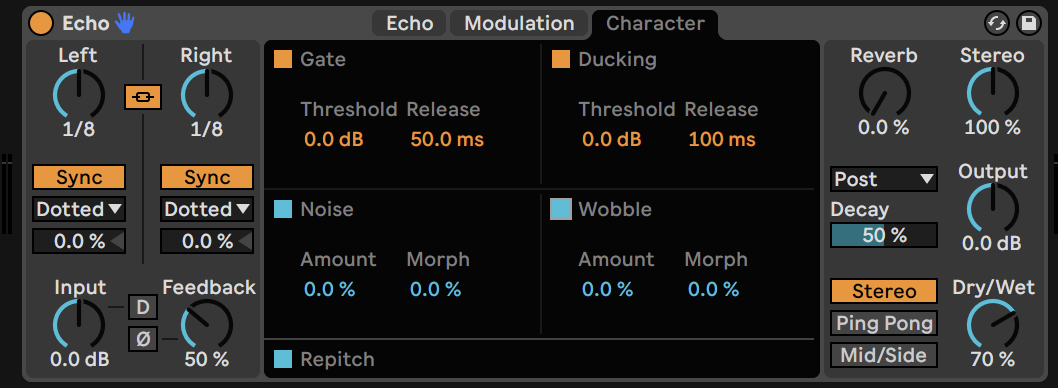
Then we get to the Modulation tab, where you can select one of the six different LFO waveforms and select the amount of modulation applied to the delay time and filter. The Character tab is super cool. Here, you can apply a gate, ducking, noise, or wobble to emulate tape machines or a clear way for the input signal.
Creative Applications for Echo
- Because there are so many modulation options built into Echo, there is a lot you can do with it to create unique textures and spaces.
- Try creating a more tape-y sound by adding noise and wobble to your delay to create that analog imperfection we all know and love!
- Try playing around with modulation options. Modulating the filter can produce unique delay sounds without needing to add filters plugins or use parallel processing.
- Use the reverb knob to combine reverb and delay. It may sound simple, but emulating real-world spaces requires reverb because no space exists without it.
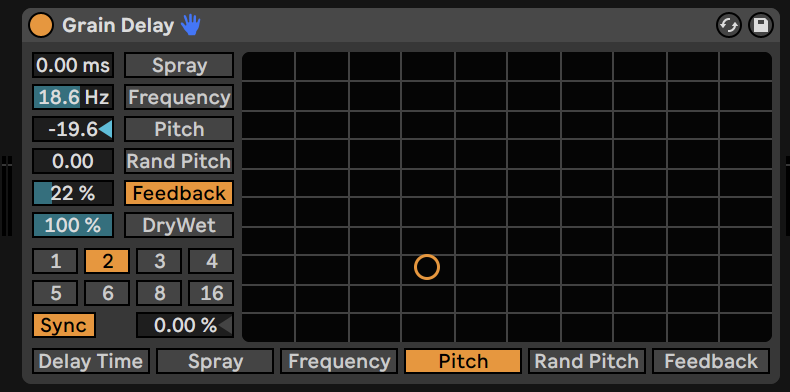
Grain Delay
Ableton’s Grain Delay is a masterpiece for creating unique and creative sounds. Grain delay works like a granular processor, slicing the input signal into tinny pieces (grains) and allowing users to manipulate them in different ways. Unlike a granular sampler, however, this plugin uses grains as delays, allowing the dry signal to shine through while processing the output signal as a creatively processed delay.
The grain delay features an X-Y plane which you can customize as needed by routing any parameter to each axis. This can result in some really wacky sounds as you change parameters in real-time.
Grain delay includes those basic delay parameters like delay time and sync, but this plugin isn’t the one to turn to for clean delays. The Spray parameter adds randomization to the delay time and the frequency parameter controls the size of each grain. You can transpose the pitch of the delay with the pitch parameter and can randomize the pitch of each grain using the Random Pitch control.
Creative Applications for Grain Delay
Grain delay is never not creative. It is great for creating textures and adding unique tails to your sounds.
- There is something to be said about the ability to create massive feedback loops with this plugin. Beware, however, of adding too much feedback and freaking out your computer and your ears.
- Try playing around with drum loops and repurposing them using this effect. You can change the random pitch and spray effects to add variations to boring old drum loops. It’s a great way to add life to your mix.
- Let your sound designer beats thrive by applying this effect to sounds in an extreme way to completely transform them into textures you never dreamed they could be! Crank that dry/wet knob to eliminate the original sound altogether and make something completely new!
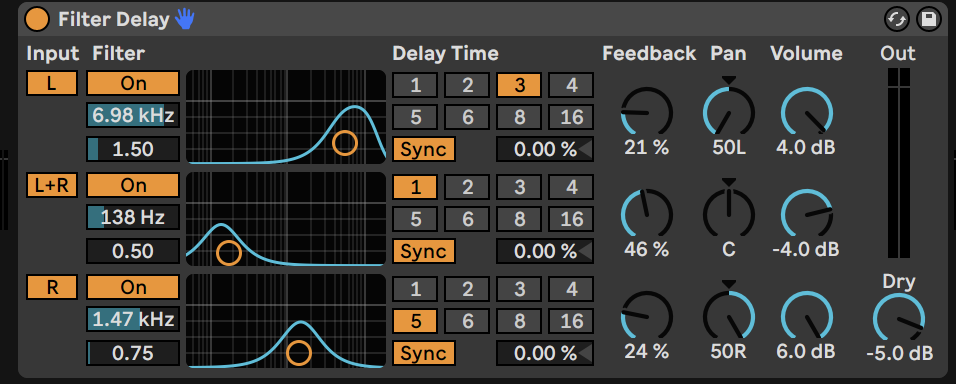
Filter Delay
The filter delay plugin uniquely features three separate delay lines/channels. The device, as suggested by its name, is based on filtering each delay line to create something new. Each line has its own bandpass filter which can be set manually using the visual or adjusting the frequency and resonance parameters. Each delay line can also be deactivated if needed.
Each delay line also features its own feedback know, volume knob, and pan know for precision and creativity. It’s like adding three delay devices on top of one another and filtering and panning each one individually.
Creative Applications for Filter Delay
- Play around with the panning and feedback of each delay line individually. This one is all about creating texture and filling space.
- Try using the filters in contrasting ways. You can change the feedback time of the low-frequencies separately from the highs to avoid muddying up the mix.
- Try applying the plugin on vocals and turning the dry/wet knob to a subtle amount to add a unique and tasteful delay to your vocals.
- Try creating an audio effect rack and processing this delay in its own chain, mixing it into the dry signal. Then you can process the delay with its own effects such as distortion or chorus to create an even more chaotic space.
That’s all for now folks! Delay is my favorite type of effect and I hope you enjoy exploring these fabulous devices as much as I do!