Ableton's Drum Buss is Life Changing
INTRODUCTION
With the recent release of Ableton Live 11, everyone is raving about new devices such as Spectral Resonator and Hybrid Reverb. And yeah, these are pretty awesome, but there are so many amazing devices that have been out for so long that remain amazing!
One of these Ableton devices is called Drum Buss. It is basically a unique drum processing plugin. There are some really, really cool features included in this little device that literally change the game for mixing drums.
Drum Buss gets its name from the mixing technique in which busses are used to process groups of tracks. This basically means that a bunch of tracks is sent to a new track which is then processed with its own chain. This technique is often used for drums because there is often a desire to make different percussion/drum tracks act more as one unit.
Some of the most common elements in a drum bus chain include EQ, compression, and distortion. Drum busses can of course feature any plugins and effects though! There are definitely some really creative ways to use busses.
Ableton tends to name their devices extremely... blatantly. This is actually a great thing because it makes it so much easier to find and understand the devices and instruments in Ableton’s collection. The drum buss fits right into this self-explanatory naming convention- its main function is to affect collections of drum sounds, packing the elements commonly used in a drum bus into one device!
LOCATING AND ADDING THE DRUM BUSS
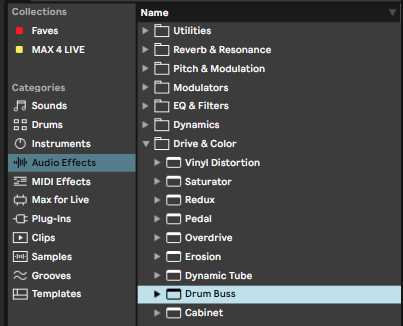
Ableton Live 11 introduced a new folder-based organization system for its audio effects. The Drum Buss can be found in the Drive & Color folder in the audio effects category. The Drum Buss most definitely fits under the Drive & Color umbrella because of its ability to alter the tone of the sound by adding some crunch and body to the signal.
To insert the drum buss into the effect chain, either drag it into the effects section on the bottom of the window or drag it directly onto a track to apply it to the end of the chain by default.
There are tons of presets (22 to be exact) which come with Ableton, but we will get into that as we go!
PARAMETERS
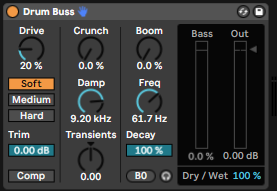
Drive and Distortion
The term “drive” can mean different things in different situations in the music production world. In the case of the Drum Buss, the drive functions as a gain knob that introduces distortion to the signal based on the distortion mode selected.
There are three distortion modes-
The Soft setting applies a waveshaping-based distortion to the signal.
The Medium setting applies a limiting-based distortion
The Hard setting adds a clipping distortion as well as a bass boost for a little extra oomph.
Trim and Compression
Below the Drive knob and distortion modes, there are the Trim and Comp parameters.
Comp is short for compression! I had to check the Ableton User Manual for this one and learned that when this parameter is toggled on a compressor is applied to the signal before it hits the distortion stage, meaning that it is applied to the signal before anything else in the drum bus. The manual let me know that the applied compressor has a quick attack, medium release, and medium ratio. Glue compressors, which are used often in busses, normally have a fast attack speed in order to smooth out the signal and make it more cohesive. Thus, these compressor settings make sense!
Trim refers to the attenuation of the incoming signal. This is the same as when a plugin has a parameter labeled “input gain,” only this attenuation is applied directly after the compression as if you were adjusting the output gain of a compressor. The trim is set to 0db by default with no attenuation applied until the parameter is adjusted into the negatives.
Crunch, Damp, and Transients
In the column to the right of the Drive and Compression column, we have three knobs.
The Crunch knob allows users to add more distortion to the signal. This distortion is focused on the upper and middle frequencies of the signal.
The Damp knob adds a low pass filter that is set by default to 9.2kHz to remove some of the higher frequencies introduced to the sound as a result of the added distortion.
The Transients knob focuses on emphasizing the transients of the upper frequencies of the sound.
Boom
Next, we’ve got my personal favorite, Boom! The Boom parameter allows you to manipulate the low-end frequencies of the signal by applying an extremely resonant filter to the low frequencies.
The frequency knob adjusts the frequency of the resonant filter, and the little round button on the bottom of the column snaps the frequency knob to the closest exact frequency of a note. When the frequency knob is not exactly centered on the note frequency, the little round button will display a plus or minus sign next to the note name.
The decay knob in this column adjusts the decay rate of the low end, providing another subtle gluing aspect to the plugin.
What is super cool about the boom section is that you can actually solo the low frequencies of the drums!
Metering
One really cool element of the Drum Buss is its Bass amplitude meter. This meter provides a great way to see the action going on in the bass without needing to pull up a spectrum analyzer!
We’ve also hot a basic output meter which also includes a slider for adjusting the output gain level/attenuation.
And below the meters, there is the basic dry/wet knob which is really awesome for mixing in some of that original signal!
IMPLEMENTATIONS AND CREATIVE USES
Drum Rack
Since Ableton’s famous drum rack is so commonly used, It wouldn’t be surprising if the Ableton developers designed the Drum Buss device with drum rack users in mind. Throwing this baby after your drum rack is a great way to add some grit and cohesion to the sounds in the drum rack as a whole unit!

Bussing the buss!
If you are more well-versed in the world of audio routing and creating buss tracks in your project is common in your workflow, consider adding the drum buss… to your bus! The device is super useful for quickly tuning up a group of tracks and adding some color. This plus an EQ and perhaps another compressor and your perc sounds will be glued together and ready to go!
Shaping the Bass
As noted in the parameters section, the Boom function on the Drum buss works as a resonator which allows you to literally fine-tune the bass frequencies to fit into the key of your song! Tune the resonant frequency to the root or fifth of your song’s key and you will be amazed at how much of a difference it can make in the overall cleanness of your mix.
Go Solo!
The Drum Buss has a really unique soloing feature! Just toggle the tiny button with the headphones and Ableton will solo the bass frequencies of the Drum Busses output. This feature provides a quick and easy way to check how your low frequencies fit into a mix or whether the low resonances are correctly tuned to fit the key.
Try it on other instruments
It might be called Drum Buss, but that doesn’t mean it’s only good for drums. Try using the drum buss on other instruments such as synth or bass tracks. You can even keep the buss functionality and throw it onto an operator or wavetable instrument track which has multiple oscillators to glue them together!
Sound effects like risers and the like are also great elements to send to the drum bus!
Presets
Ableton supplies 22 presets for the Drum Buss. Some of them include settings based on bass tuning such as “Boom in G.” Others, like the “Drum Softener” are great starting points for achieving specific results.
CONCLUSION
All in all, the Drum Buss is a small but extremely mighty tool that has some really unique and useful assets. It might seem constrictive to those who like to have control over every single parameter of every single effect, but it is easy to omit effects that you don’t need and focus on those like the Transient or Boom parameters which are more unique.
Try out the Drum Buss! You won’t regret it.