Sync To Picture Prep in Logic
Javi Lloret
You’re about to start a Sync To Picture project on Logic, and you probably can’t wait to start scoring the track right? However, there are a few things we need to take care of before actually start composing the music such as making sure we’re lined up with the movie, sample rate, frame rate, and make sure we can effectively move around the session with the best setup possible for our needs.
SAMPLE RATE & FRAMERATE
The first thing to do is know what are the specs of the movie file we’re working with. To do so, it’s usually recommended to open up the movie on QuickTime and click Cmd + I to open the Inspector.
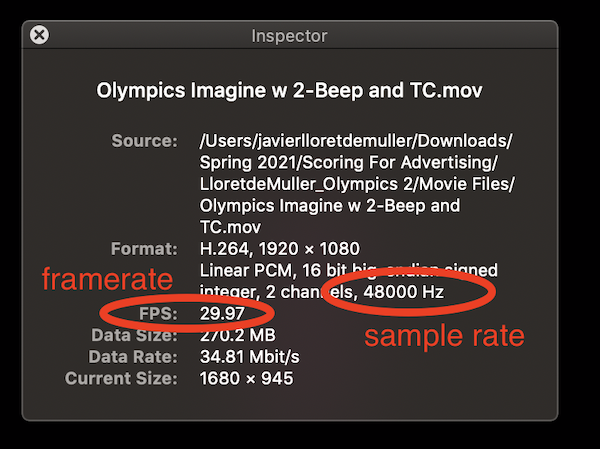
As you can see above, the Inspector will give us all the essential info to know about. However, the main information we want to focus on for setting up Logic is both the Sample Rate and the Framerate *if you don't know what those mean, make sure to check our knowledge base for some awesome articles about these two important concepts*
Now that we learned about our movie clip, let's open Logic and import the Movie:
As you can see, Logic is smart. And in the process of importing the movie, it detected that my session's Sample Rate and Framerate didn't match the movie's. So two windows popped up and suggested those changes. Because I had already checked my Sample Rate and Framerate before, I can now click on those settings confidently.
Now that everything is set up we have to make sure that the first bar of our project matches with the actual start of the spot (01:00:00:00 on the Timecode, also known as SMPTE). Many clips for scoring will come with a 2-beep, which is a 2 second visual and audio marking that appears before the start of the movie as a time reference for all the people working on the project. In order to keep the 2-beep in our project, and still sync the start (01:00:00:00) with Logic's Timecode AND bar 1 of our score, we need to do the following:
1) Create negative bars in logic by dragging back the triangle on the RULER (bars) area
2) Go to File > Project Settings > Synchronization -- check that Bar position 1 1 1 0 plays at SMPTE 01:00:00:00
3) Go to File > Project Settings > Movie -- on the 'Position' section, match the Movie's position with the SMPTE that appears on the movie clip at the beginning

4) Double-check that everything looks good. If you did everything alright, and the Frame Rate is correct the movie should sync with Logic's timecode entirely.
*To open the Giant Time Display click on the little arrow next to Logic's Display, here you can also change what shows up on the Display:
Everything is synchronized!
Now we can go into some workflow tricks to make sure your session is optimized as much as possible.
THE BIG 5 (Global Tracks)
First of all, I'd like to talk about the 'Big 5', as my Scoring teacher named them: the 5 Global Tracks you should have activated for all your scoring work.
In case you didn't know, Logic has a section named 'Global Tracks' on the tracklist, and as its name indicates, instead of being a regular type of track where you can record Audio or Sequence MIDI regions on Virtual instruments, these tracks control parameters that affect the entire session, such as Tempo, Signature, Transposition, among others. For scoring, there are 5 that you'll be using very often: Markers, Movie, Signature, Tempo, and Beat Mapping. Let's activate those five by right accessing the Global Tracks area, and right-clicking in there to see the available options:
The Global Tracks section gets a little crowded, so you'll have to click the Blue arrow back and forth to open and close the Global Tracks section so it doesn't take that much space.
VISIBLE SAMPLE RATE
It might happen that you have other musical projects aside from the Scoring work on Logic. Very usually you'll find yourself changing the Sample Rate from one session to the other, typically between 44.1kHz and 48kHz. What if you switch and forget to change it back to 48kHz when you're exporting stems for the Final Delivery? You will be delivering stems at 44.1kHz, which is not the industry standard, and they probably will not take you seriously as a professional composer. We want to make sure that doesn't happen if you want them to call you again. To avoid this situation, a good recommendation is to have a visible Sample Rate on your Display. We can access this option on the "Customize Control Bar and Display" section of Logic:
That way we'll always know if we're at the correct Sample Rate.
MARKER TRICKS
If you're working on a Short Spot, this might be super useful: the "Create Marker Set from Scene Cuts" option. Logic has an option that detects all the cuts in the movies (change of camera or scene) and creates markers very precisely where those cuts occur. If the clip is relatively short, this might save you a lot of time when creating your Markers and spotting the hit points of your clip where you want to sync a specific bar on your composition:
*you can rename and add more markers as you please. This does not limit those options from being available.
LOGIC'S HIDDEN (BUT HANDY) CONTROLS
Logic has some handy controls that are a little bit hidden but can be very useful for composers when doing sync work. Some of them are Nudge Value, Lock/Unlock SMPTE, Previous/Next Markers, among others. To access this hidden control bar, place your mouse over the bar that separates the Display and the Tracks area, and a little extensor will appear. Drag it down and they will all show up!

BEAT MAPPING
Last but not least, one of the most useful options which makes Logic stand out from the rest of "Sync to Picture" software is Beat Mapping. Logic makes it very easy to match a specific moment of your movie to a musical bar of your composition. To do so, create a marker at the frame you want to sync with a bar of the session, access the Beat Mapping track on Global tracks, and make sure both the Tempo and Beat Mapping global tracks appear one after the other. Now, select your marker, and you'll see a small line appear in the Beat Mapping track, that's your hit point. The last thing to do is dragging the bar where you want that hit point to be synched at, and voilà. everything lines up!
You'll notice Logic will adapt the tempo of the session to match the Beat Mapping we've just done.
And that's everything for today! I hope some of these tips were helpful, from now it's all about the creative work on the scoring. Have fun!
Sign-up for a Peer Training today if you’d like to learn more about these and other topics at library.berklee.edu/training