Ableton's Session View: The Basics
One of the most distinctive aspects of Ableton Live is its beautifully crafted “Session View.” Ableton LIVE gets its title from this live-looping-based interface which can be used in a multitude of different ways, all super awesome for workflow, composition, arranging, songwriting, beat making, and performing.
Many people have the false belief that Ableton’s Session View is reserved for live performance. However, this interface has some awesome features that can be used both on and off stage. Let’s check it out.
A Quick Tour
I always like to compare the Session View to a spreadsheet. There are functions that can happen both vertically and horizontally, and also within individual cells.
When you open Ableton, you’ll probably notice right away that it doesn’t look like your “normal” DAW (Logic, ProTools, etc). Ableton defaults any new project to the Session View, so it’s the first thing you will see when you open the software for the first time.
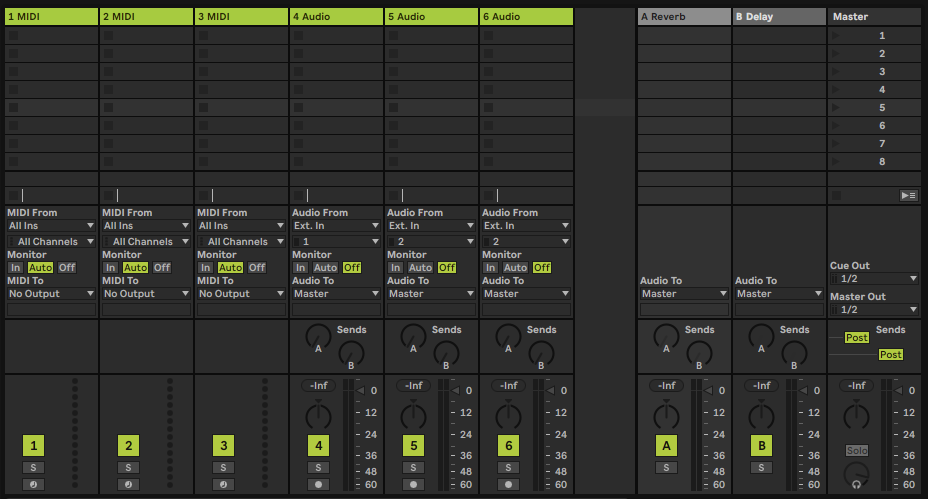
The columns shown in the image above represent tracks. These vertical tracks each correspond to one of the horizontal tracks in the Arrangement view (hit TAB on your keyboard to toggle between the two views).
Each track has cells that represent what Ableton refers to as “clips.” These clips can be triggered individually or triggered as a whole by clicking on the corresponding Master row’s play button (all the way on the right). These rows are called “scenes.”
You can see below that I have added a few audio clips to some audio tracks. These can be looped or edited as needed. MIDI clips can be created in the same fashion in MIDI tracks.
Above the track columns, we have our control bar. There are a few important things to note about this bar.

On the far right of the image above, we have a dropdown menu that defaults to 1 Bar. This means that any scenes or clips triggered in the Session View will automatically begin playing on the first beat of the next bar. This can be changed by selecting a different option from the dropdown menu.
Here, we’ve got a play button, stop button, and the record button on the left. The record button will record any clips or scenes triggered in the Session view directly into the Arrangement view.

On the far right, we have a hollow circle. This button is called the Session Record button and will begin recording new clips in any record enabled / armed tracks in the Session View if an empty slot or scene is selected.
Application/Example 1:
Imagine you had an amazing idea for a chord progression that you wanted to loop during a section of your song. You could record the progression into a MIDI clip in one of your tracks and then press the play button to loop it.
Say, then, you wanted to add a drum pattern during the second section of your song and you wanted the chord progression to change. In the next row, you can record a new MIDI progression and add a drum loop. You can trigger scenes in the order you want them to play and they will begin playing on the first beat of the next measure or whatever trigger-quantize setting you have selected from the dropdown menu.
You want to record your scenes in a specific order so that they show up in this order in the arrangement view. So, you hit record and begin triggering clips and scenes. Finally, you press the spacebar to stop recording and you press TAB. There you find the performance you just played recorded in order!! Now, you can begin editing, adding, and composing in the Arrangement view!
Example/Application 2:
Imagine you want to create a performance where you loop drum sequences, synth bass patterns, direct input guitar, and audio clips. You can do all of this by using the session view.
You can record and trigger audio clips, play different scenes and sequences, and even record your performance to the arrangement view while you perform!